
A screen saver is a dynamic drawing or pattern that appears on the screen when the user does not perform mouse or keyboard actions for a specified period of time.
Screen savers were originally used to protect monitors from phosphor burnout during computer downtime, nowadays this problem is not relevant and now screen savers are mainly used to customize the computer or to enhance its security with passwords.
- How to open the screen saver settings window
- How to enable or disable the screensaver
- Standard screensaver customization
- Customizing screen savers in the Registry Editor
- Ribbons
- Mystify
- Bubbles
- 3D Text
- Other screensaver settings
- Turning off the screensaver
- Prevent changing screen saver
- Force specific screen saver
- Timeout
- Password protect
- Settings in the Local Group Policy Editor
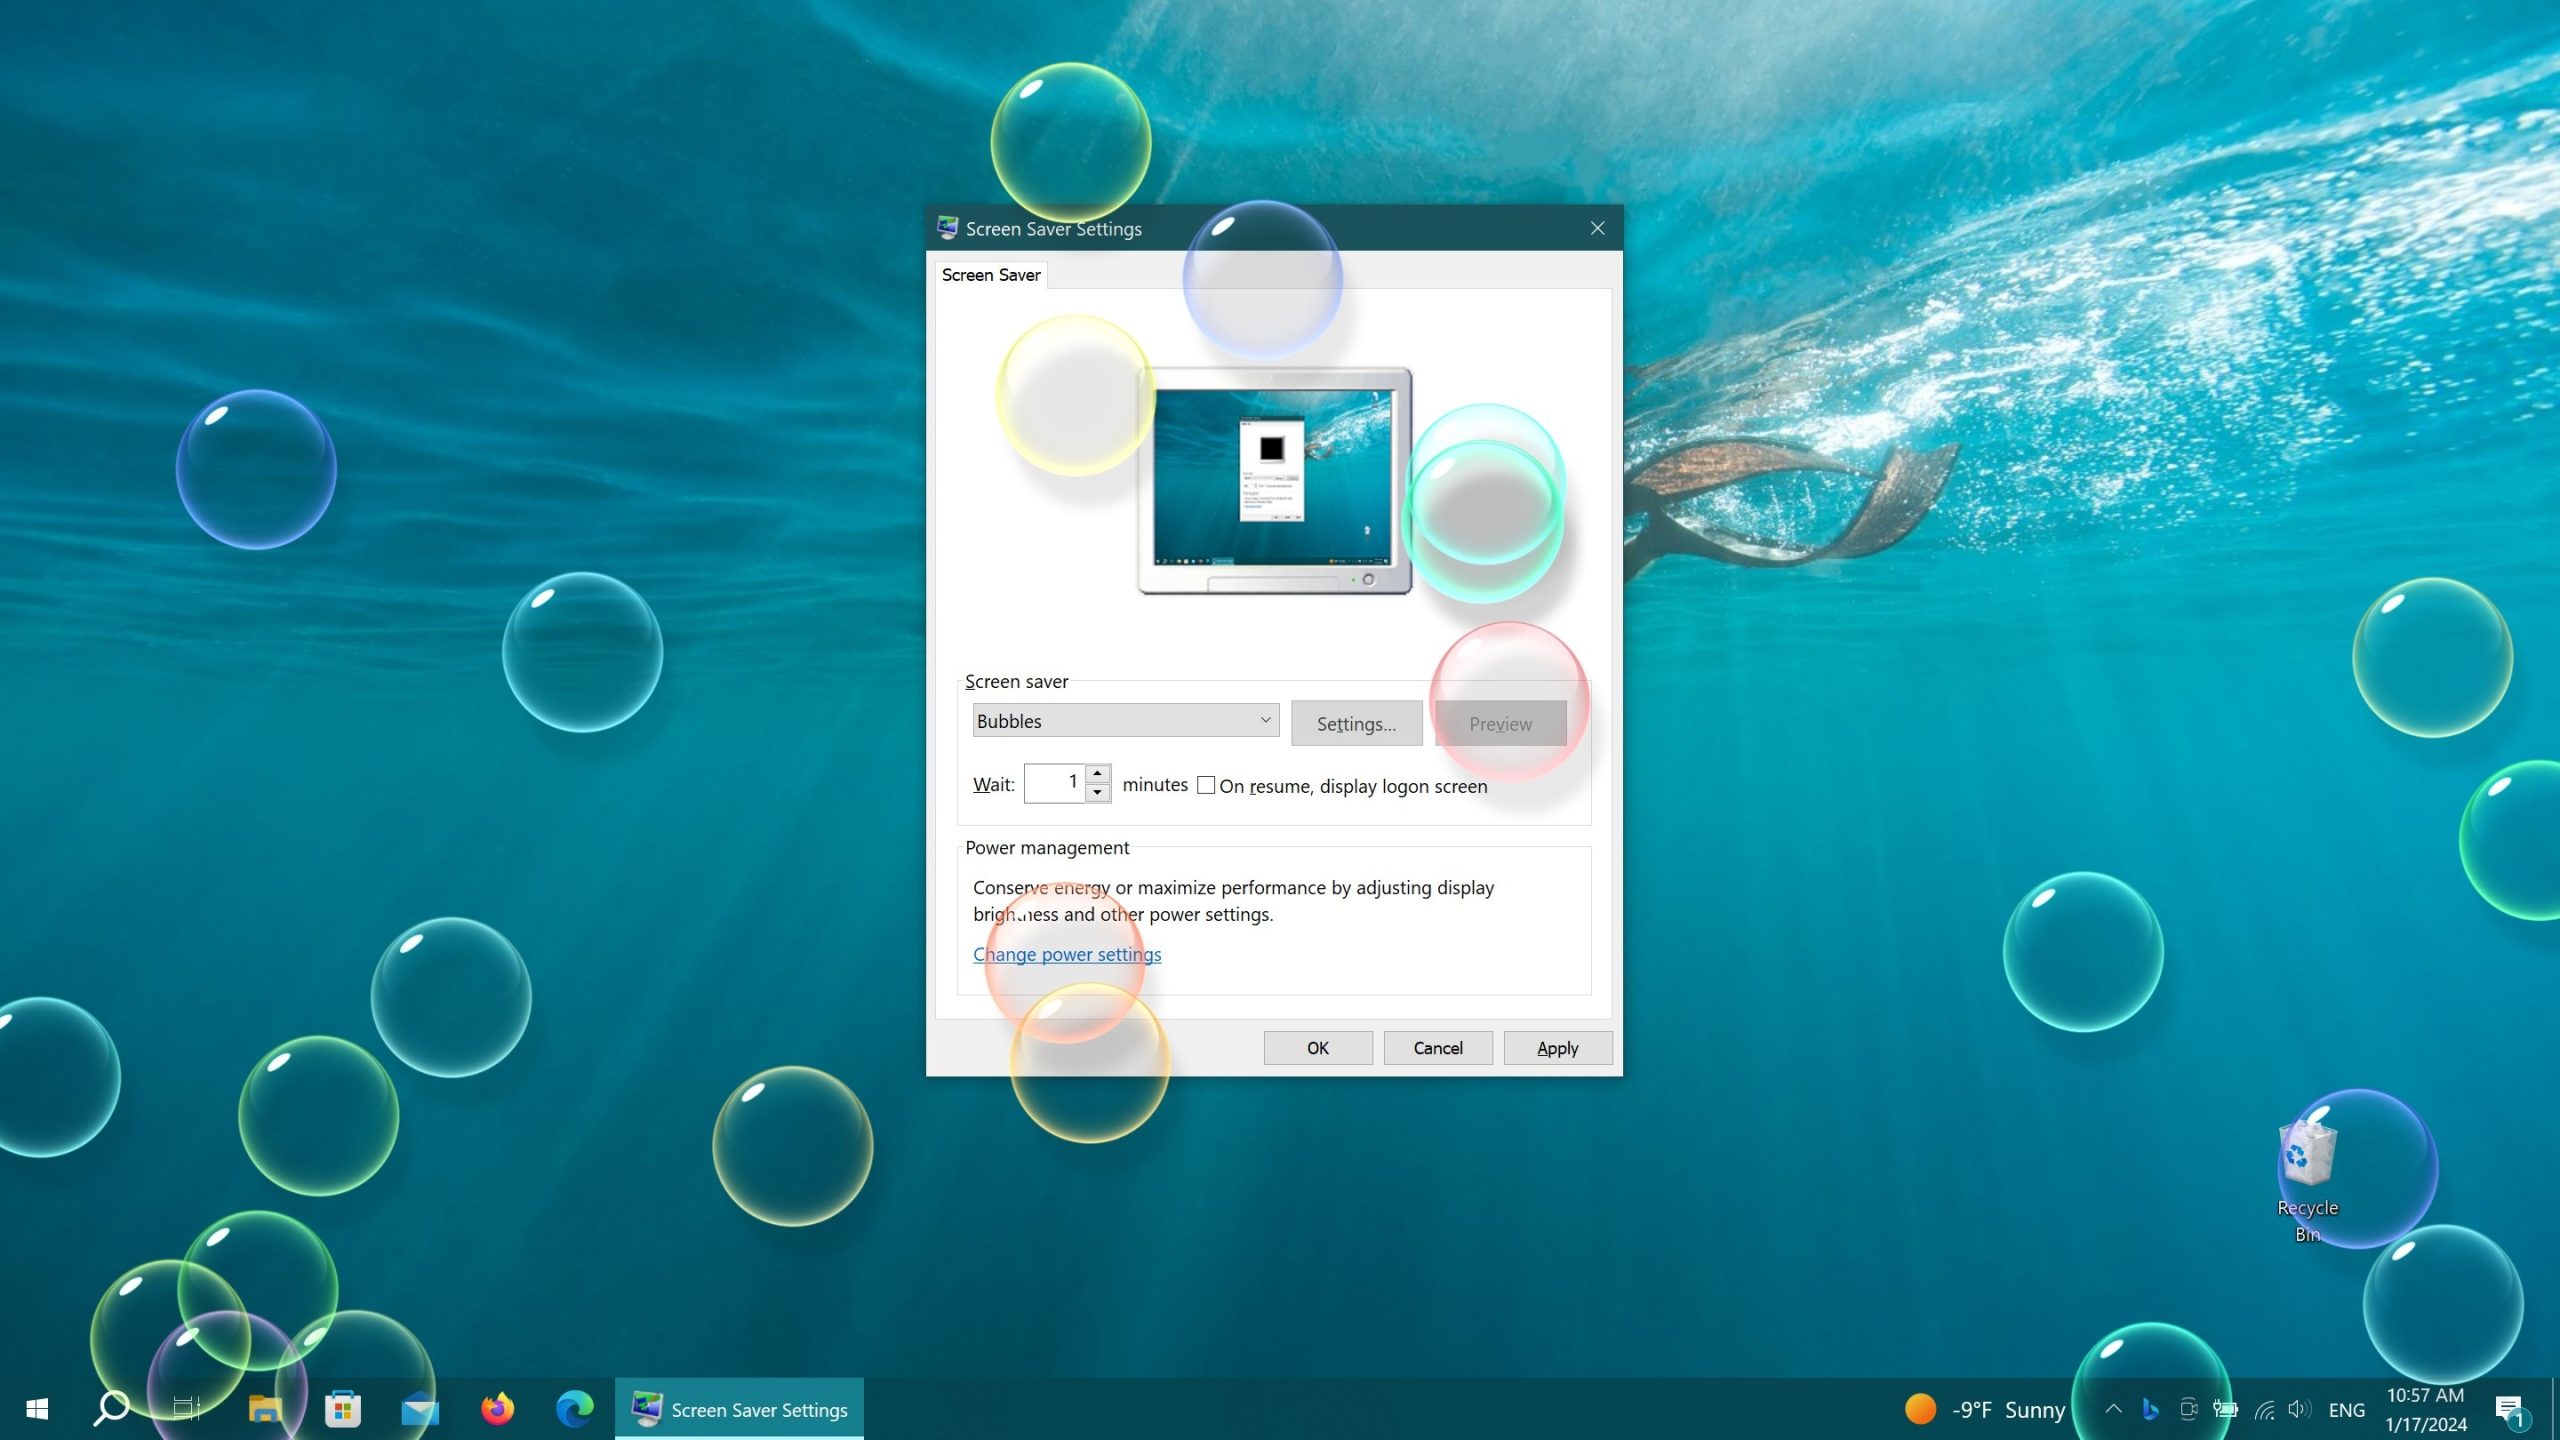
How to open the screen saver settings window
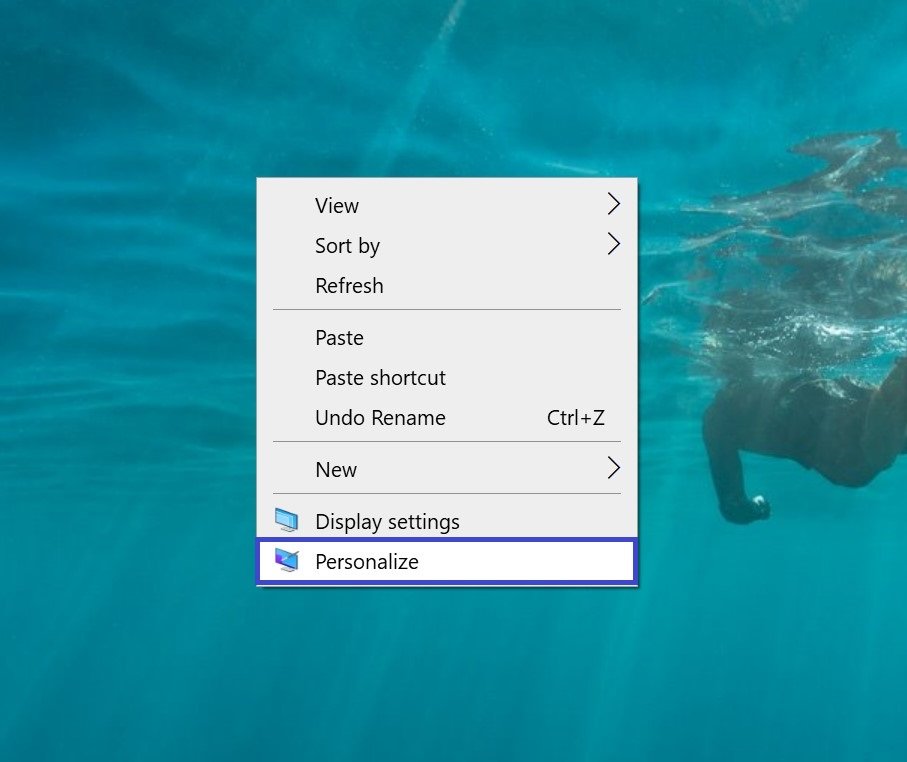
To open the Screen Saver Settings window, right-click in an empty area of the desktop and select Personalize in the context menu that appears
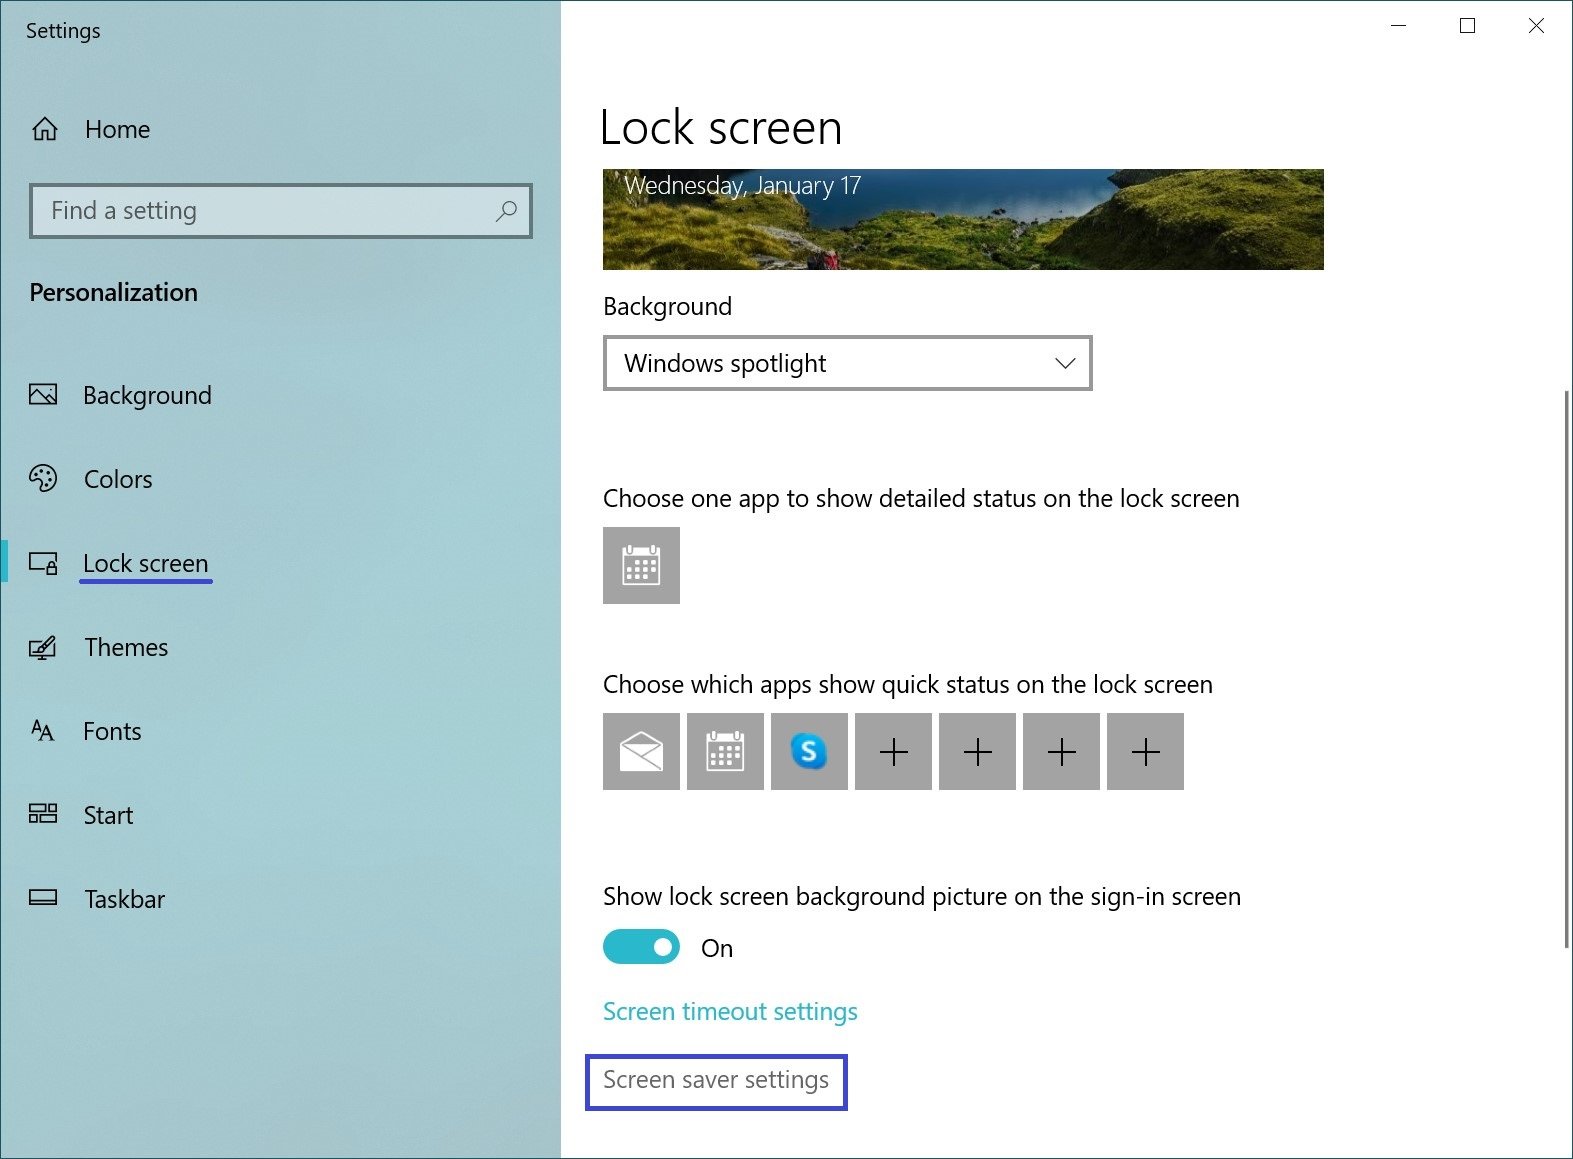
In the Settings window that opens, select the Lock Screen tab, then scroll the side scrollbar to the bottom of the window and click on the Screen saver settings link
Also, to open the “Screen Saver Settings” window, successively open:
Start ➯ Settings ➯ Personalization ➯ Lock screen ➯ Screen saver settings
You can open the screen saver settings window by using the search. To do this, click the search icon on the taskbar or press the Win+S key combination, type screen saver in the search bar and select Change screen saver

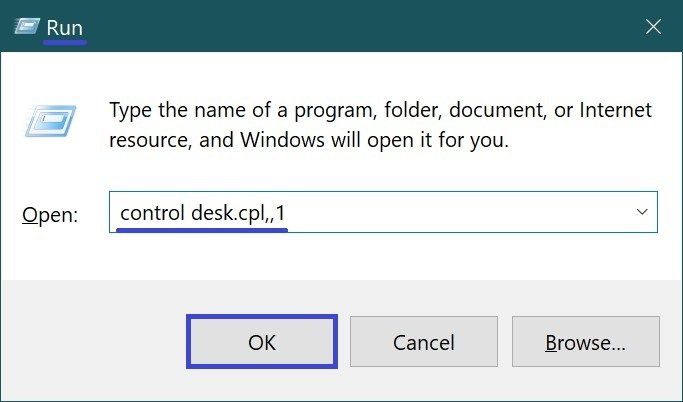
You can also open the “Screen Saver Settings” window using the Run dialog box by pressing the Win+R key combination, type (copy and paste) control desk.cpl,,1 in the opened Run window and click OK.
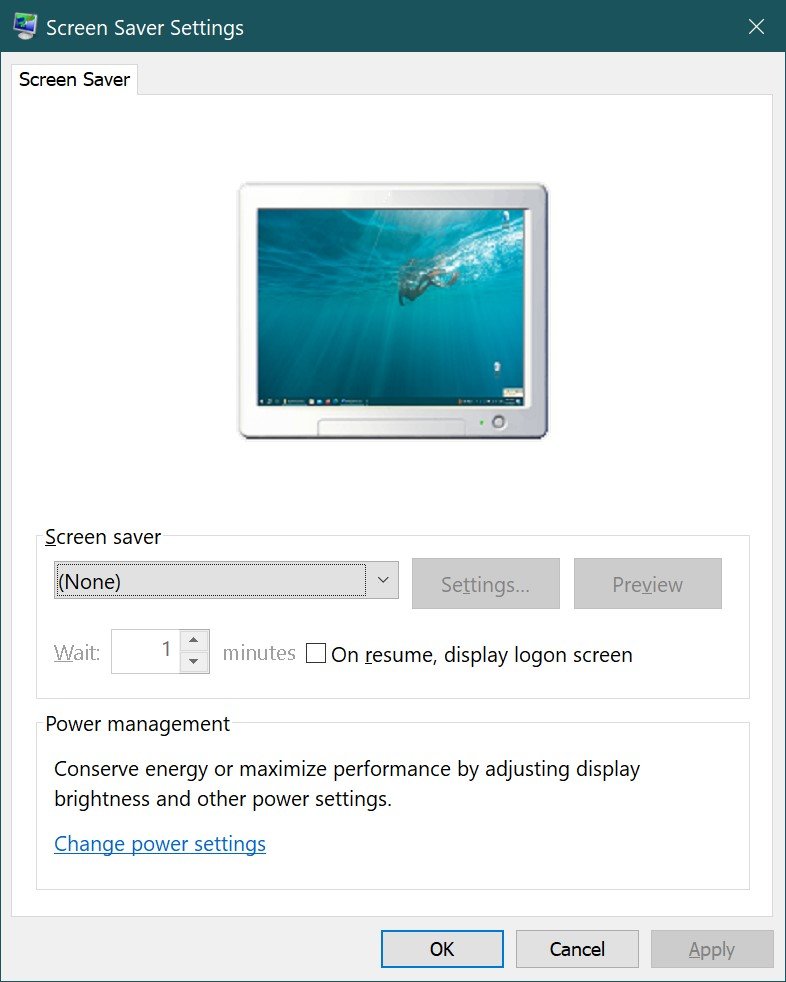
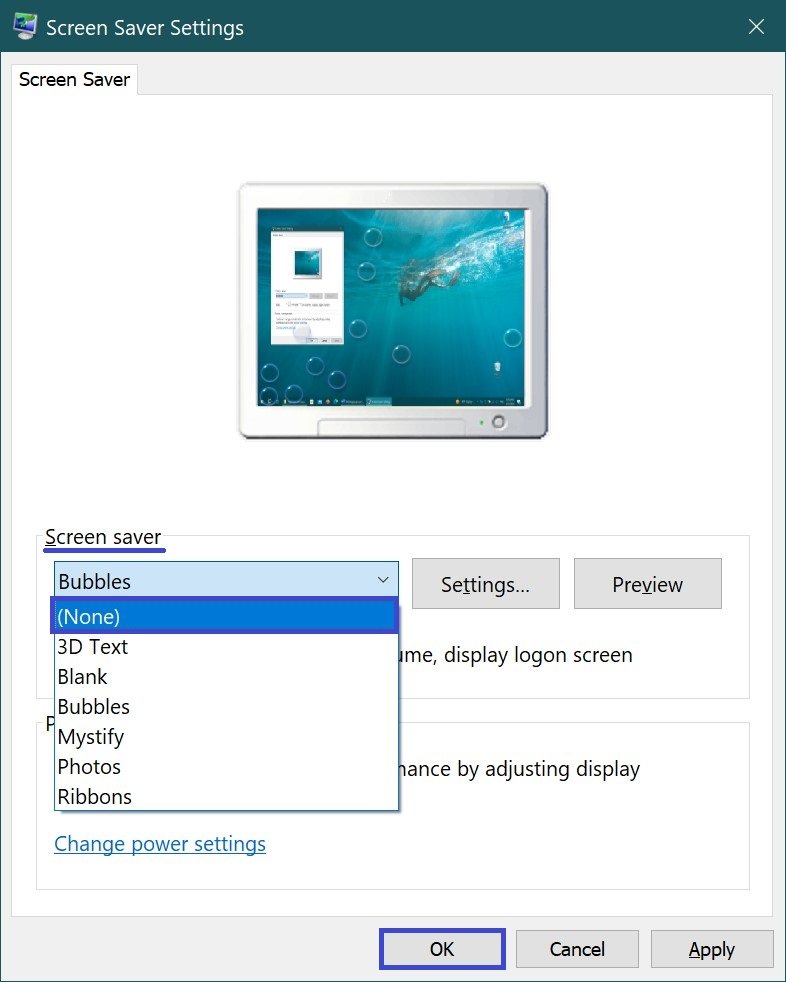
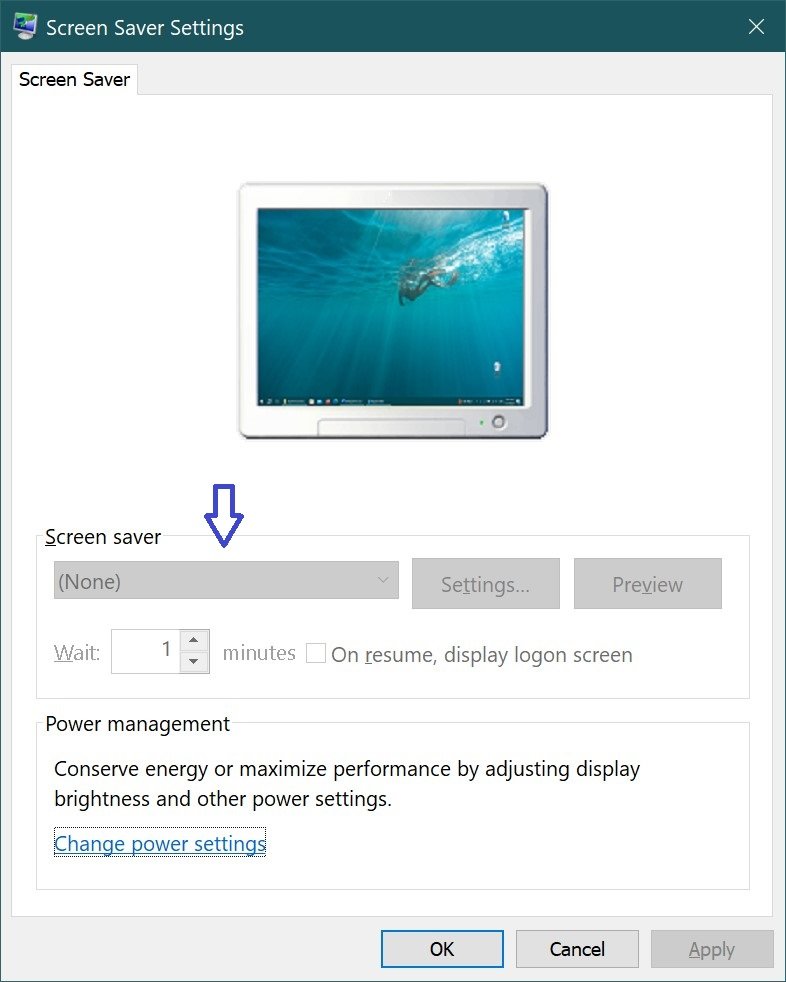
Doing any of the above will open the “Screen Saver Settings” window shown in the image below.
How to enable or disable the screensaver
To enable the screen saver, select any available screen saver from the Screen Saver drop-down list and click OK.

To disable the screen saver, select (None) from the Screen Saver drop-down list, then press the OK button.
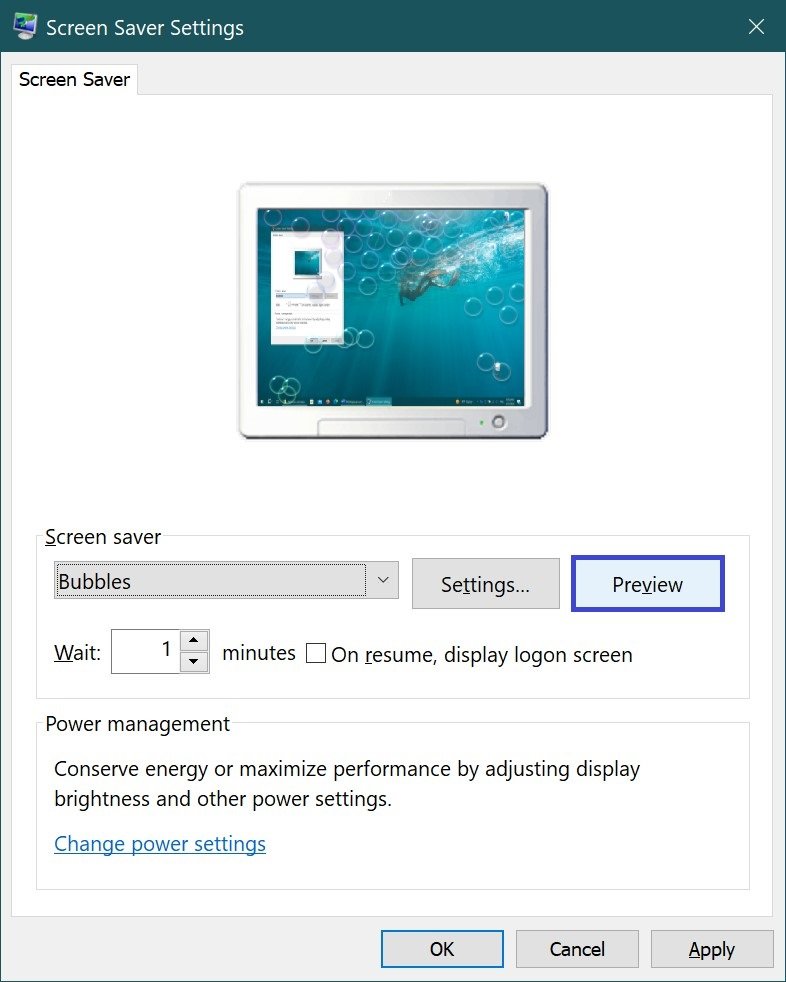
Also in the Screen Savers Options dialog box, you can view what the screen saver will look like before a specified period of time passes during which the user does not perform any actions. To do this, click the Preview button.
To finish viewing the screensaver simply move the mouse or press any key on the keyboard.
Standard screensaver customization
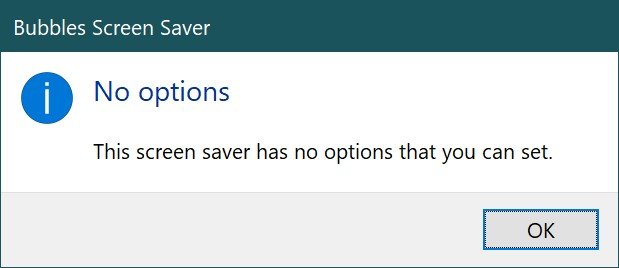
Most standard screensavers do not have the ability to customize settings. When you click the Settings button, instead of opening the screen saver settings window, only an informational message appears, indicating that the selected screen saver has no customizable settings.
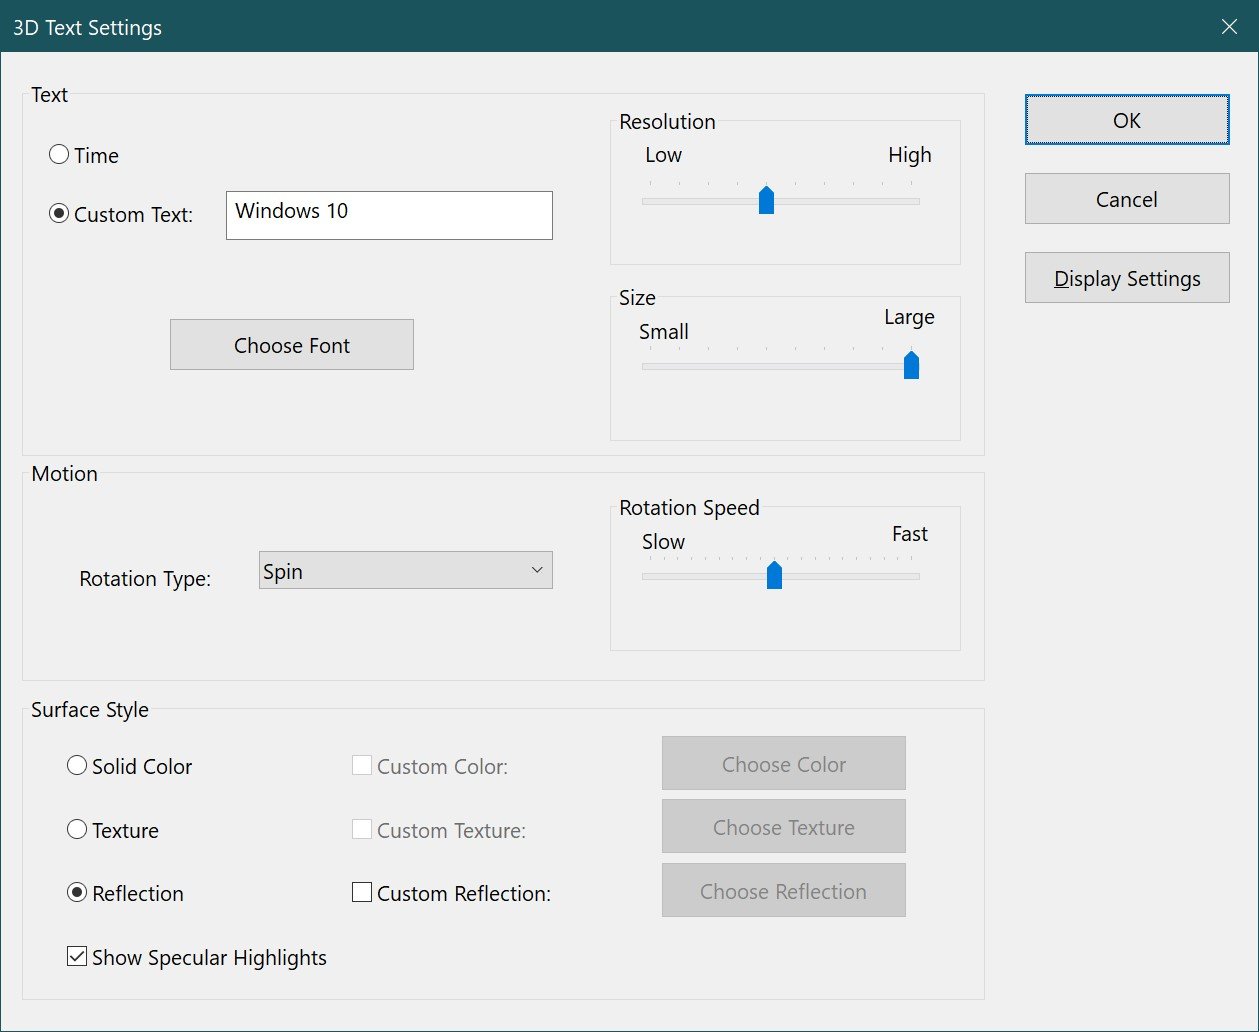
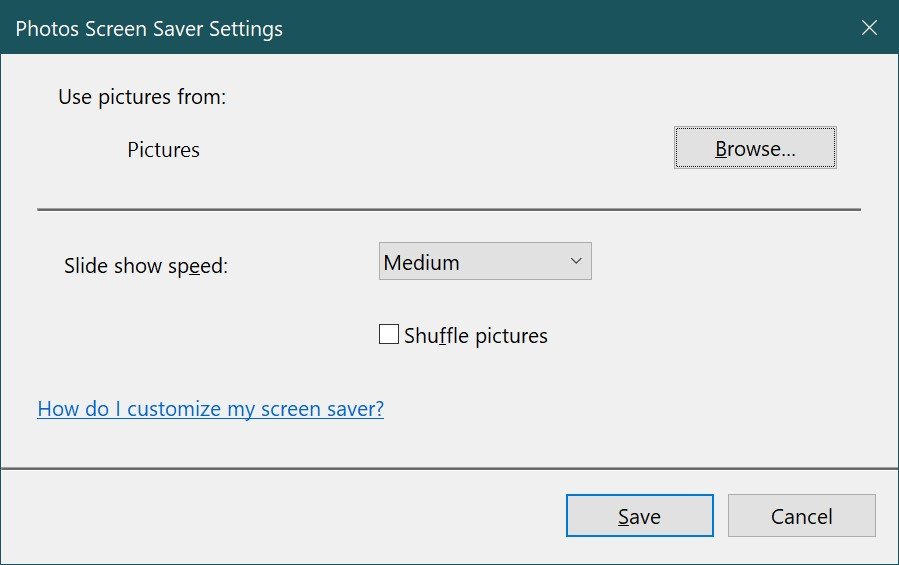
Only two screensavers can be customized using the GUI, the 3D Text and Photos screensavers.
The image below shows the 3D Text screen saver Settings window, where you can enable the current time display or change the default text to your own, as well as select the font, change the rotation type and other settings.
Also shown in the image below is the Photo Screen Saver Settings window, where you can choose from which folder to show photos or images, as well as the speed of the slideshow or enable randomizing the order in which images are shown.
You can read more about how to set and customize photos as your screen saver in the article ➯ How to set photos as your screen saver in Windows 10.
Customizing screen savers in the Registry Editor
This method allows you to change various screen saver settings and involves changing settings in the Windows system registry
Before making any changes to the registry, it is highly recommended that you create a system restore point
All standard screen savers can be customized using the Registry Editor. Let’s look at some screen saver settings, including those that can also be customized using the GUI.
All screen saver settings that can be changed use parameters of type DWORD (32-bit).
Ribbons
To change the settings of the Ribbon screensaver, create and apply the following registry file:
Windows Registry Editor Version 5.00
[HKEY_CURRENT_USER\SOFTWARE\Microsoft\Windows\CurrentVersion\Screensavers\Ribbons]
“CameraFOV”=dword:00000010
“RibbonWidth”=dword:3dfd2400
“NumRibbons”=dword:00000008
“Blur”=dword:00000001
“SpanMultiMon”=dword:00000001
Parameter Description:
- The value of the CameraFOV parameter affects the camera proximity, the higher the value of the parameter, the closer the ribbons are displayed.
- The RibbonWidth parameter defines the maximum width of flying ribbons.
- The NumRibbons parameter is responsible for the number of ribbons that fly across the screen.
- The Blur parameter affects the ribbon trace. If the value is set to 0, the ribbon trace will not disappear. If you set it to a higher value, the ribbons will rest on each other.
- SpanMultiMon only affects users with multiple monitors. Setting the parameter to 1 allows the splash screen to move between two monitors.
- The AllScreensSame parameter is used for computers with multiple monitors. Only two values are available for this parameter. If you set this parameter to 1, the same configuration file will be used on all monitors and an identical screensaver will be displayed.
The result of making changes to the system registry is shown in the screenshots below.

Mystify
To change the Mystify screensaver settings, create and apply the following registry file:
Windows Registry Editor Version 5.00
[HKEY_CURRENT_USER\Software\Microsoft\Windows\CurrentVersion\Screensavers\Mystify]
“CameraFOV”=dword:00000002
“LineWidth”=dword:00000014
“NumLines”=dword:00000006
“SpanMultiMon”=dword:00000001
Parameter Description:
- The value of the CameraFOV parameter affects the proximity of the camera, the higher the value of the parameter, the closer the ribbons are displayed.
- The LineWidth parameter defines the maximum width of the line trace.
- The NumLines parameter is responsible for the number of lines that fly across the screen.
- SpanMultiMon parameter values affect only users with multiple monitors. Setting the parameter to 1 allows the splash screen to move between two monitors.
The result of making changes to the system registry is shown in the screenshots below.
Bubbles
To change the settings of the Bubbles screensaver, create and apply the following registry file:
Windows Registry Editor Version 5.00
[HKEY_CURRENT_USER\Software\Microsoft\Windows\CurrentVersion\Screensavers\Bubbles]
“ShowShadows”=dword:00000001
“MaterialGlass”=dword:00000000
“ShowBubbles”=dword:00000001
“TurbulenceForce”=dword:499602da
“TurbulenceSpeed”=dword:00000008
“SpanMultiMon”=dword:00000001
“SphereDensity”=dword:4153a200
“TurbulenceNumOctaves”=dword:00000055
“Radius”=dword:42294180
Parameter Description:
- With the ShowShadows parameter you can specify whether a shadow will be displayed under the bubbles. If you set the value to 0, there will be no shadow, and if you set the value to 1, there will be a shadow under the bubbles.
- The ShowBubbles parameter defines the screen color. Also, only two values are available for this parameter. If the value is set to 0, the bubbles will move on a blank screen, and if the value is set to 1, the custom desktop will be visible when the splash screen appears.
- The TurbulenceForce parameter affects the color of the bubbles, and when set to 0, the color of the bubbles becomes black. To set the desired color, you need to experiment with this parameter. For example, to make all bubbles shimmer in different colors, you can specify the value 499602da or 1234567898 in decimal notation.
- The TurbulenceSpeed parameter is responsible for the average speed of bubbles moving across the screen. The parameter values can vary from 0 to 10, i.e. the minimum speed is set to 0 and the maximum speed to 10.
- SpanMultiMon parameter values affect only users with multiple monitors. Setting the parameter to 1 allows the splash screen to move between two monitors.
- With the SphereDensity parameter, you can specify the exact number of bubbles that will move across the screen. In order to choose a certain amount, you need to experiment. For example, to make only 4 bubbles move across the screen, specify the value 3d278480 or 1026000000 in decimal notation. The maximum value in decimal notation is 2100000000.
- With the TurbulenceNumOctaves parameter you can specify the rate of change of the bubble color. Values from 1 to 255 are available for this parameter. The larger the value of the parameter, the faster the color of the bubble will change. And, accordingly, if you set the value equal to 1, the colors will practically not change.
- The Radius parameter is responsible for the size of the bubble. As with the TurbulenceForce and SphereDensity parameters, you need to experiment a bit to specify the size. The maximum value of the parameter is 435a6e80 or 1130000000 in decimal notation.
The result of making changes to the system registry is shown in the screenshots below.
3D Text
To change the settings of the 3D Text screen saver, create and apply the following registry file:
Windows Registry Editor Version 5.00
[HKEY_CURRENT_USER\Software\Microsoft\Windows\CurrentVersion\Screensavers\ssText3d]
“AllScreensSame”=dword:00000000
“SurfaceType”=dword:00000002
“Specular”=dword:00000001
“SurfaceColor”=dword:0040ff00
“CustomEnvironment”=””
“CustomTexture”=””
“UseCustomColor”=dword:00000000
“UseCustomTexture”=dword:00000001
“UseCustomEnvironment”=dword:00000000
“MeshQuality”=dword:00000258
“Size”=dword:0000000a
“RotationSpeed”=dword:0000000a
“RotationStyle”=dword:00000001
“DisplayString”=”winnote.RU”
“DisplayTime”=dword:00000000
“FontWeight”=dword:000002bc
“FontItalic”=dword:010000ff
“FontFace”=”Times New Roman”
Parameter Description:
- The AllScreensSame parameter is used for computers with multiple monitors. Only two values are available for this parameter. If you set this parameter to 1, the same configuration file will be used on all monitors and an identical screensaver will be displayed.
- You can use the SurfaceType parameter to select the text surface style. To set the “Solid Color” style, set the value to 00000000. To set the Texture Drawing style, set the value to 00000002, and for the Reflection style, set the value to 00000001.
- You can display highlights using the Specular option. Only two values are available for Specular. If you set this option to 1, specular highlights will be displayed.
- The SurfaceColor parameter allows you to specify the color of the text displayed on the screen. For example, if you specify the parameter value equal to 0040ff00, the text will be displayed in bright green color.
- The CustomEnvironment string parameter specifies the path to the reflection picture for the surface style of the volumetric text in *.bmp format.
- The CustomTexture string parameter specifies the path to the texture image for the surface style of the volumetric text in *.bmp format.
- The UseCustomColor parameter is responsible for whether the Other Color checkbox is selected. Only two values for this parameter are available. If you set this parameter to 1, the color is taken from the SurfaceColor parameter.
- The UseCustomTexture parameter is responsible for whether the Select Texture checkbox is selected. Only two values are available for this parameter. If you set this parameter to 1, the reflection is taken from the CustomTexture parameter.
- The UseCustomEnvironment parameter is responsible for whether the Select Reflection check box is selected. Only two values are available for this parameter. If you set this parameter to 1, the reflection is taken from the CustomEnvironment parameter.
- The level of text resolution is selected using the MeshQuality parameter. This parameter can have 10 values. Namely: 00000064, 000000c8, 0000012c, 00000190, 000001f4, 00000258, 000002bc, 00000320, 00000384 and 000003e8.
- The Size parameter is responsible for the size of the displayed text. Values from 1 to 0a (10 in decimal notation) are available.
- The RotationSpeed parameter is responsible for the rotation speed of the text. Values from 1 to 14 (20 in decimal notation) are available.
- With the RotationStyle parameter you can specify the type of text rotation. There are 5 types of rotation – None, Twist, Swing, Wave and Flip. To specify the No rotation type, set the parameter value to 00000000. For the Torsion type – 00000001, Swing – 00000002, Waves – 00000003, and to set the Flips type, set the value to 00000004.
- With the string parameter DisplayString you can specify the text to be displayed during the screen saver.
- The DisplayTime parameter is responsible for displaying the current time instead of text. Only two values for this parameter are available. If you set this parameter to 1, the current time will be displayed during the screen saver.
- With the FontWeight parameter, you can specify whether the text will be plain or bold. To make the text plain, specify the value equal to 00000190, and if you want to make the text bold, specify the value of 000002bc.
- The FontItalic parameter is responsible for italicized text. To make the text italic – specify the value equal to 01000000, and for italic – 010000ff.
- With the help of the string parameter FontFace you can specify the font for the displayed text.
The result of making changes to the system registry is shown in the screenshots below.
Other screensaver settings
Using the registry editor, you can also disable the screen saver completely, select a specified screen saver and prevent it from changing, set the screen saver timeout, and specify password protection.
Turning off the screensaver
With this registry setting, you can prevent screen savers from running. To do this, create and apply the following registry file:
Windows Registry Editor Version 5.00
[HKEY_CURRENT_USER\Software\Policies\Microsoft\Windows\Control Panel\Desktop]
“ScreenSaveActive”=”0”
After the registry file is applied, the Screen Saver section of the Screen Saver Options dialog box will become inaccessible. As a result, you will not be able to change the screen saver settings.
Prevent changing screen saver
With this registry setting, you can prevent changing screensavers. In addition, the setting prevents you from using the Control Panel and Personalization to add, customize, or modify screensavers on your computer. However, the startup of the screensaver is not prohibited.
Create and apply the following registry file for this setting:
Windows Registry Editor Version 5.00
[HKEY_CURRENT_USER\Software\Microsoft\Windows\CurrentVersion\Policies\System]
“NoDispScrSavPage”=dword:00000001
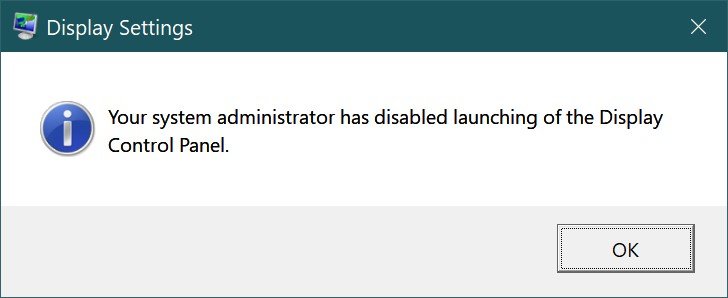
After applying the registry file, if you try to open the “Screen Saver Settings” window using any of the methods described at the beginning of this article, you will receive a message System Administrator has disabled the ability to customize the screen in the Control Panel.
Force specific screen saver
When you apply this registry file, only the screensaver that was specified in the registry file is used. In addition, the screen saver drop-down list in the Screen Saver Options dialog box in the Personalization Control Panels becomes unavailable.
For the registry file to be applied correctly, you must enter the name of the screensaver file, including the SCR extension. If the screensaver file is not located in the %Systemroot%\\System32 directory, you should enter the full path to the file.
Windows Registry Editor Version 5.00
[HKEY_CURRENT_USER\Software\Policies\Microsoft\Windows\Control Panel\Desktop]
“SCRNSAVE.EXE”=”C:\\\\Windows\\\\System32\\\\Mystify.scr”
Timeout
You can also use the system registry to define the user inactivity time after which the screen saver starts. For this parameter, you can set the inactivity time between 1 second and 86400 seconds (24 hours). In the following example, the time is set to 60 minutes:
Windows Registry Editor Version 5.00
[HKEY_CURRENT_USER\Software\Policies\Microsoft\Windows\Control Panel\Desktop]
“ScreenSaveTimeOut”=”3600”
Password protect
You can also set password protection for the screen saver. Using the following registry setting, all screen savers are password protected.
Windows Registry Editor Version 5.00
[HKEY_CURRENT_USER\Software\Policies\Microsoft\Windows\Control Panel\Desktop]
“ScreenSaverIsSecure”=”1”
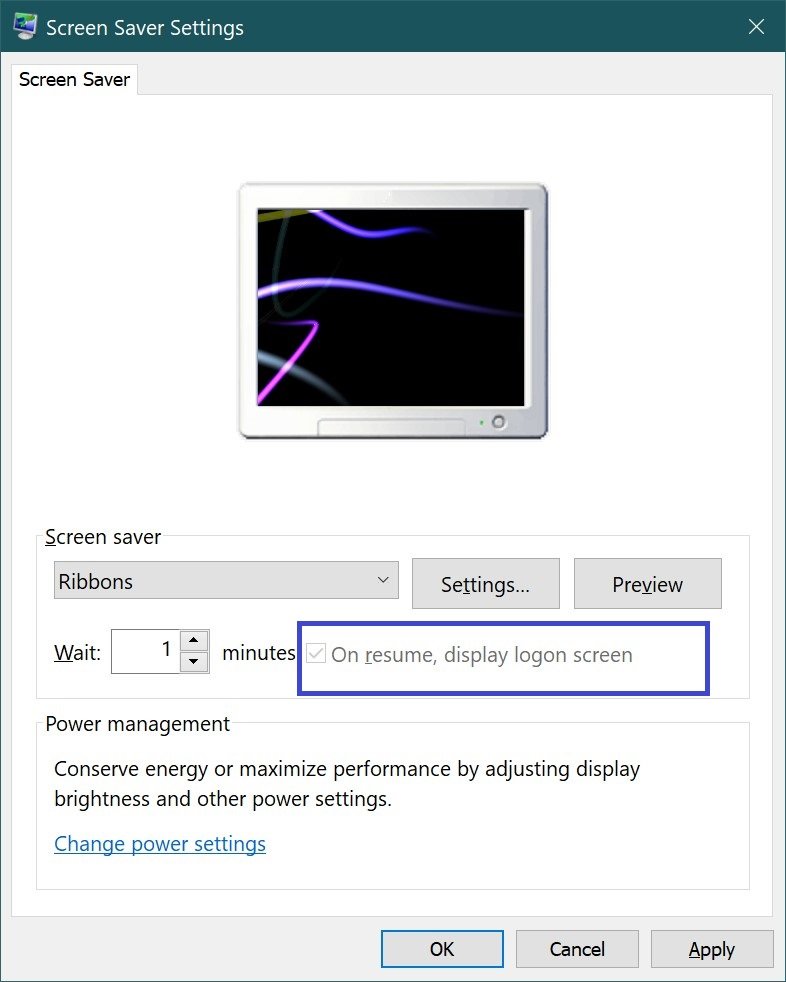
Also, after applying the registry file, the Start from login screen option cannot be unchecked in the Screen Saver Options dialog box
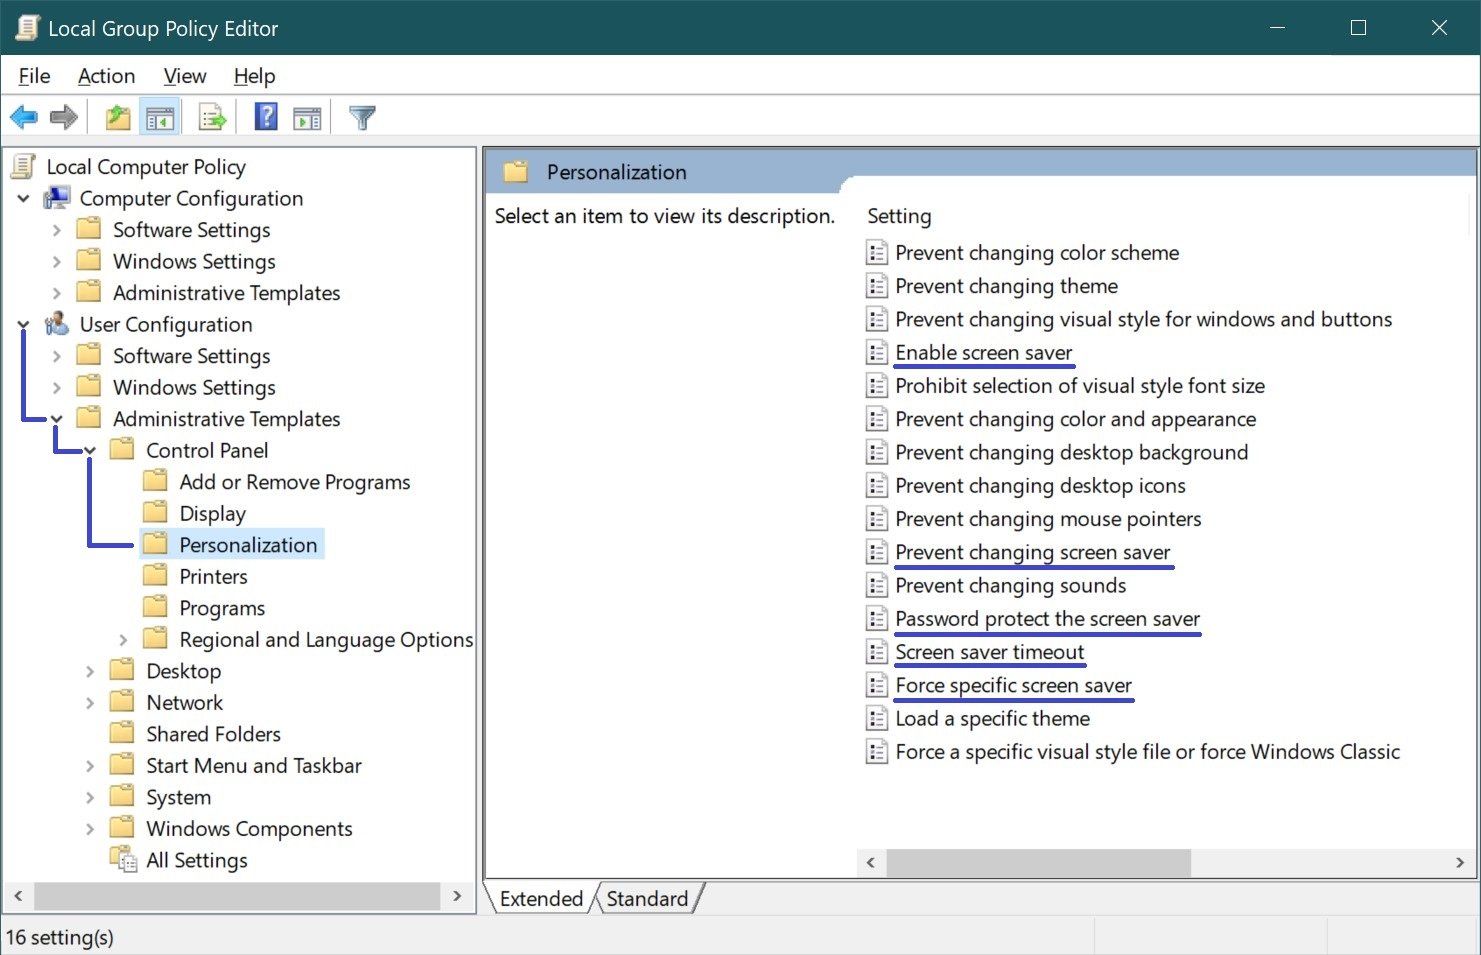
Settings in the Local Group Policy Editor
All of the above other screen saver settings can also be changed in the Local Group Policy Editor.
The Local Group Policy Editor is available in Windows 10 Pro, Enterprise, and Education editions.
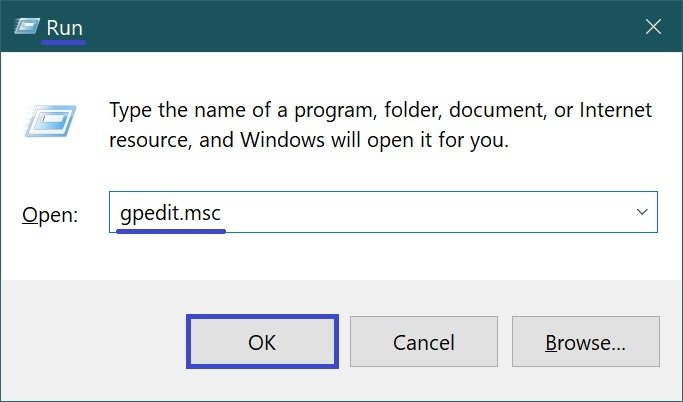
Open the Local Group Policy Editor by pressing Win+R, type (copy and paste) gpedit.msc in the Run window that opens, and click OK.
In the Local Group Policy Editor window that opens, expand the following items in the list:
User Configuration ➯ Administrative Templates ➯ Control Panel ➯ Personalization
The right side of the window contains policy settings that can be changed. The following settings are available for the screen saver:
- Enable
- Prevent changing
- Password protect
- Timeout
- Force specific screen saver
These are the different ways you can customize screen saver settings in Windows 10.


