Windows Security is a built-in Windows 10 service that offers a user-friendly interface and tools for managing common operating system security features. This includes Windows Defender, which offers real-time protection for your computer against viruses and other malware.
This guide will show you how to get started with your Windows 10 security settings and perform everyday tasks using the built-in antivirus to protect your computer from malware and hackers.
- Windows Security and Windows Defender
- Overview of Windows 10 security features
- How to check your computer for malware
- Quick virus check
- Full virus scan
- Customisable virus scanning
- Virus scanning by a standalone module
- How to view the security log
- How to temporarily disable Windows 10 antivirus
- How to enable ransomware protection
- How to exclude files and folders from being scanned
- How to check account security
- How to manage network security with a firewall
- Viewing firewall status
- Enable or disable the firewall
- How to protect your device from malicious code
- Protection of reputation
- Isolated view
- Exploit protection
- How to enable core isolation in Windows Security
- How to view the health and performance report
- How to manage parental controls and monitor devices
- Configuring Windows security notifications
Windows Security and Windows Defender
Before delving into the manual, you need to understand the difference between the terms Windows Defender and Windows Security:
- Windows Security is a service that offers a single interface for viewing the status and managing security features such as antivirus, firewall, performance and others.
- Windows Defender is built-in software that offers real-time protection against malware, viruses, spyware, ransomware and more.
Installing a third-party antivirus automatically disables the Defender but does not affect the operation of the “Windows Security” service. Similarly, disabling the built-in antivirus or firewall will not disable Windows Security.
Overview of Windows 10 security features
Windows Security is a simple, intuitive application. You can open it from the Start menu or by double-clicking the shield icon in the notification area of the taskbar.
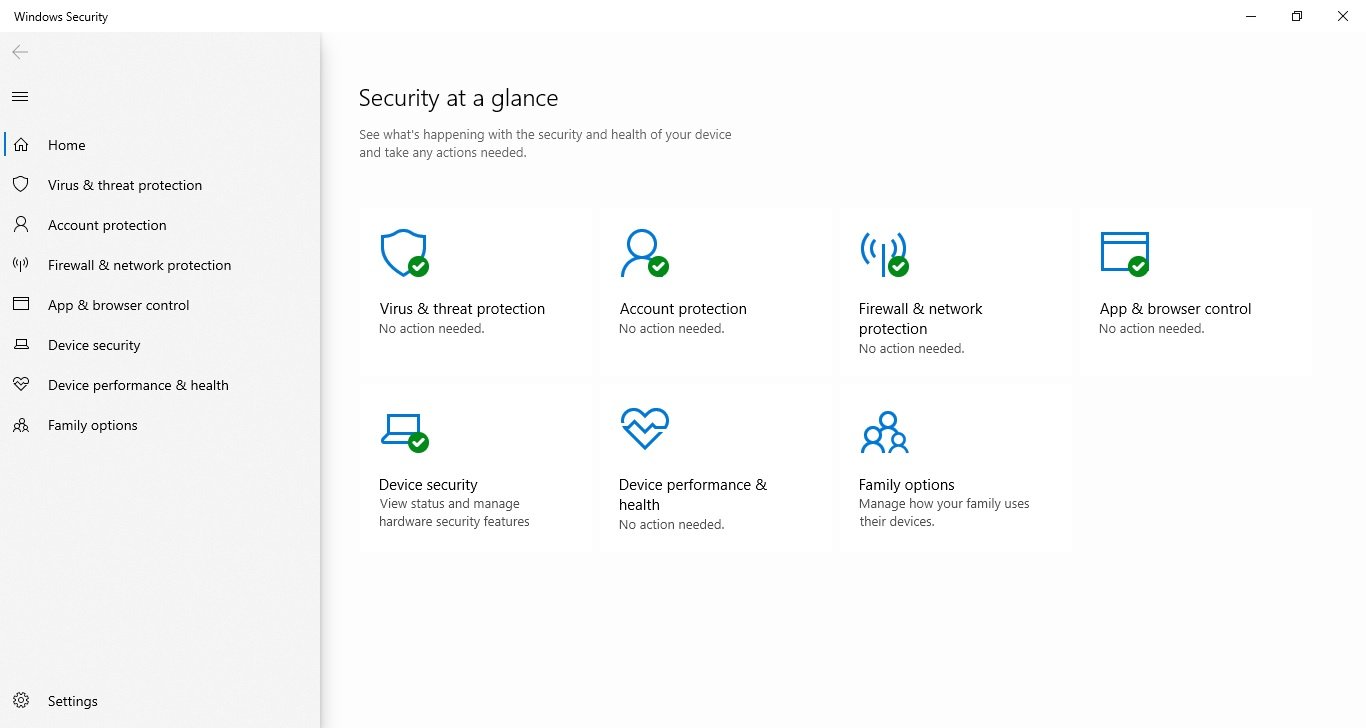
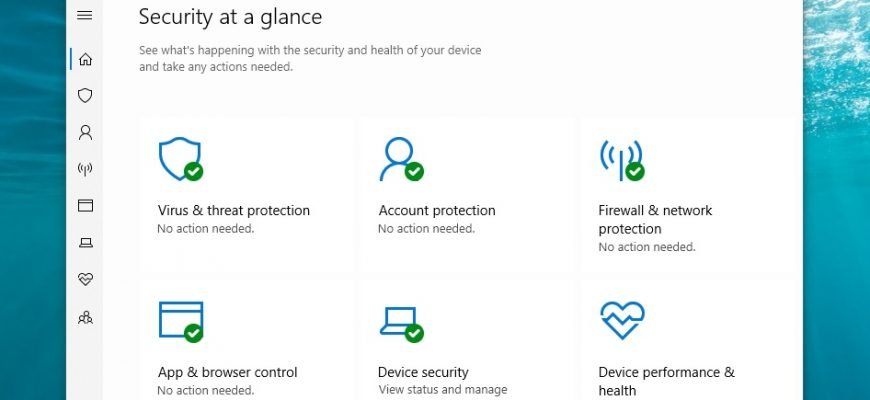
The home page allows you to view the security status of all security features available by default in Windows 10. It also displays warnings about any actions you need to take to secure your computer.
The shield icon in the taskbar notification area can also warn you when an action needs to be performed. If there is more than one warning, only the most serious warning is displayed.
Windows Security includes seven areas of protection that you can manage:
- Virus and Threat Protection – contains settings for the built-in anti-virus. It allows you to monitor malware protection, scan your device for threats, run offline scans, and configure an advanced ransomware protection function.
- Account protection – allows you to insist on protecting your account in Windows 10.
- Firewall and network protection – allows you to monitor network connections and configure various settings for the built-in firewall.
- Application and Browser control – helps protect against malicious code hidden in applications, files or websites.
- Device security – contains hardware-level security features such as core isolation to protect your computer from attacks.
- Device performance and health – a report on the performance of your computer.
- Family options – offers easy access to managing family devices using your Microsoft account.
How to check your computer for malware
Windows 10 automatically updates its malware databases and regularly scans your device for malware. But you can do all these checks manually.
Quick virus check
A quick scan takes less than a minute and scans only those parts of the system most likely to be hiding malware.
To run a virus scan with Microsoft Defender, follow these steps:
- Click on Virus and Threat Protection.
- Press the Quick scan button.
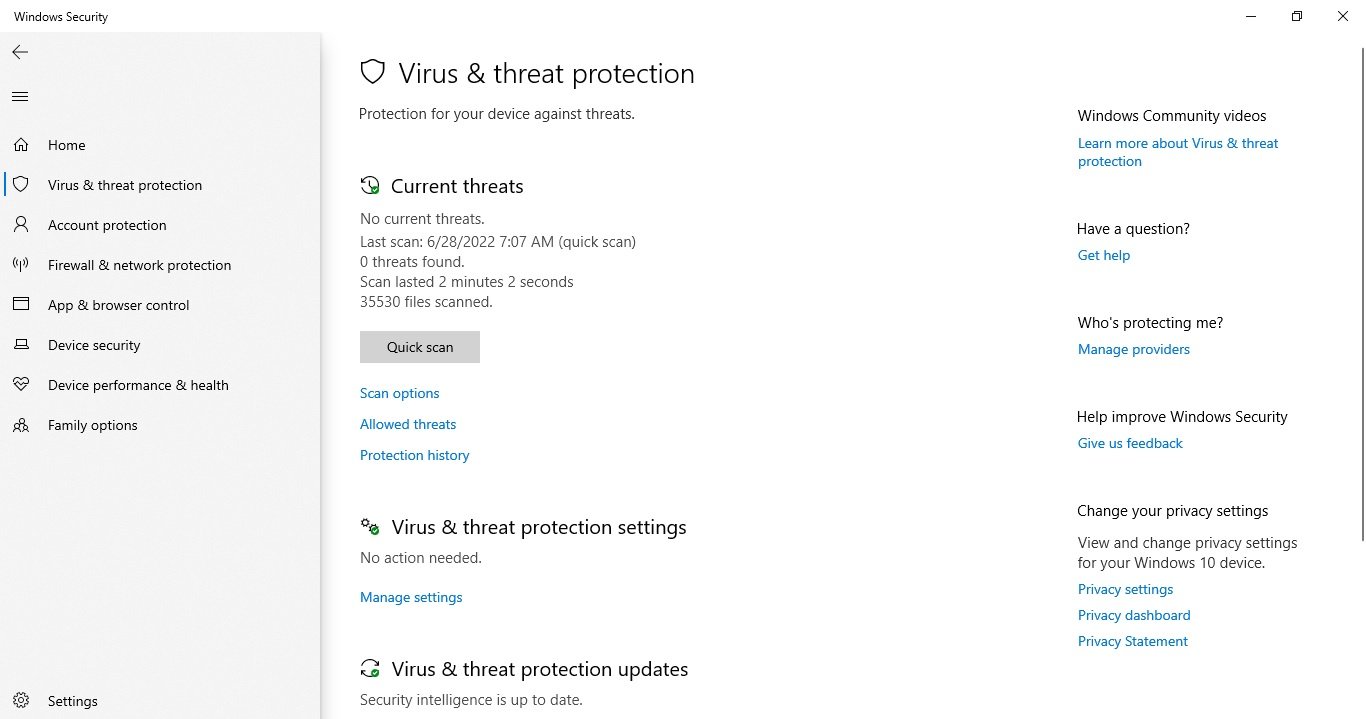
Once you have completed these steps the system scan will start and the “Current threats” section will show the threats detected, as well as the time it takes to complete the scan and the number of files scanned.
If you suspect that there is a virus on your computer, try running a full scan.
Full virus scan
A full virus scan takes longer, but it checks all files, folders and applications.
To run a full virus scan with Microsoft Defender, follow these steps:
- Click on Virus and Threat Protection.
- Under Current Threats, click the Scan Options link .
- Select the Full scan option, click Scan now.
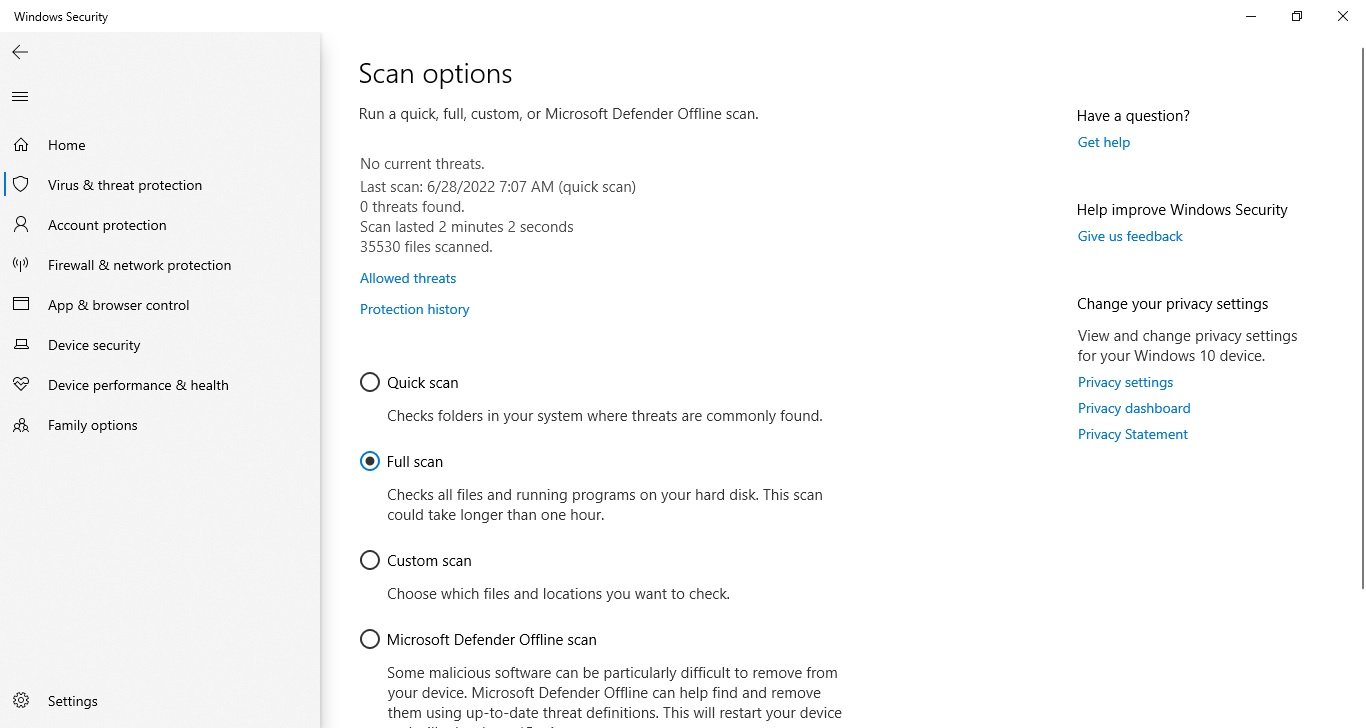
Once these steps have been completed you can continue to use your device, the antivirus will perform a full scan to detect any potential malware in the background.
Customisable virus scanning
If you only want to scan a specific folder or file, Windows 10 Antivirus provides the option to perform a customised scan.
To run a customised virus scan, follow these steps:
- Click on Virus and Threat Protection.
- Under Current Threats, click the Scan Options link.
- Select the Custom scan option, click the Scan now button.
- Select a location to scan and click the Select Folder button.
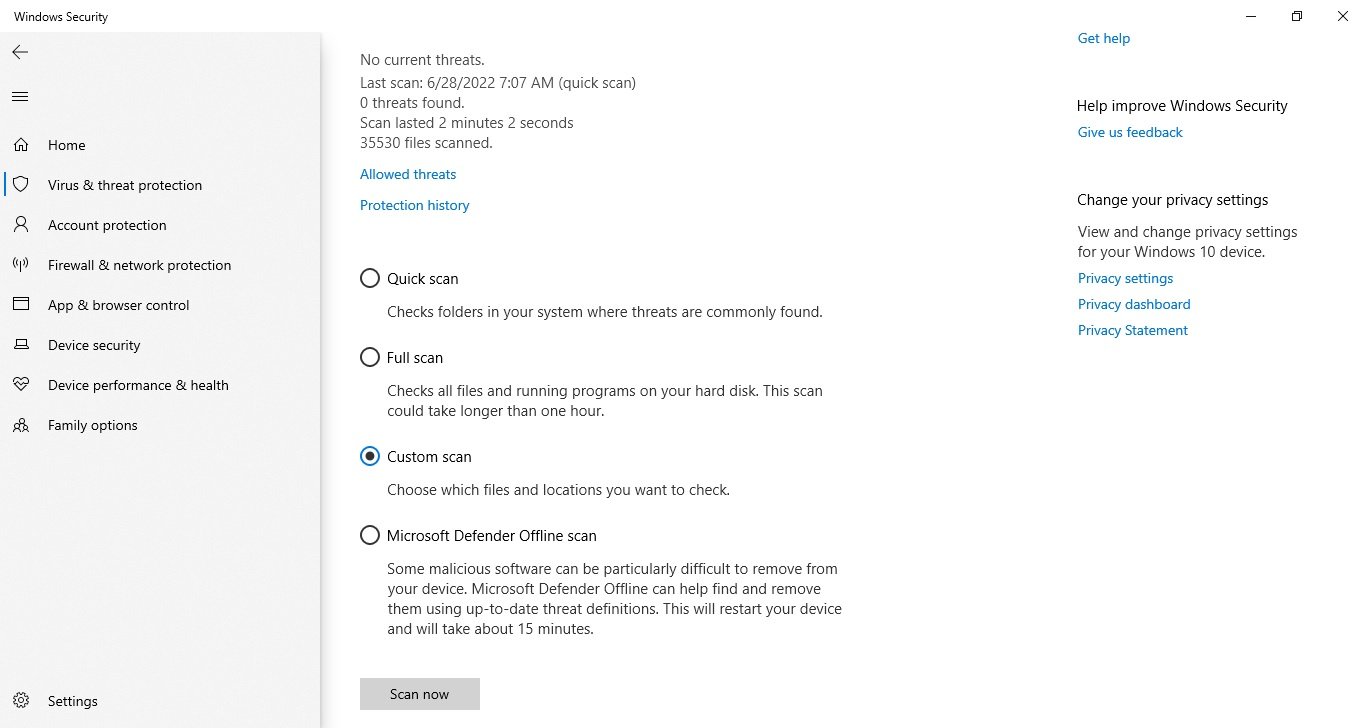
You can right-click on a drive, folder or file and select “Scan using Microsoft Defender” from the context menu to perform a spot scan.
Virus scanning by a standalone module
Sometimes, if you are dealing with a serious virus or other type of malware, the antivirus may not remove it while Windows 10 is running. In this case, you can use for offline scanning.
When you use the standalone feature, your computer automatically reboots in a recovery environment and performs a full scan before running Windows 10.
To run a virus scan by the standalone module, follow these steps:
- Click on Virus and Threat Protection.
- Under Current Threats, click the Scan Options link.
- Select the Microsoft Defender Offline scan option.
- Click the Scan now button.
- In the window that opens, click the Scan button.
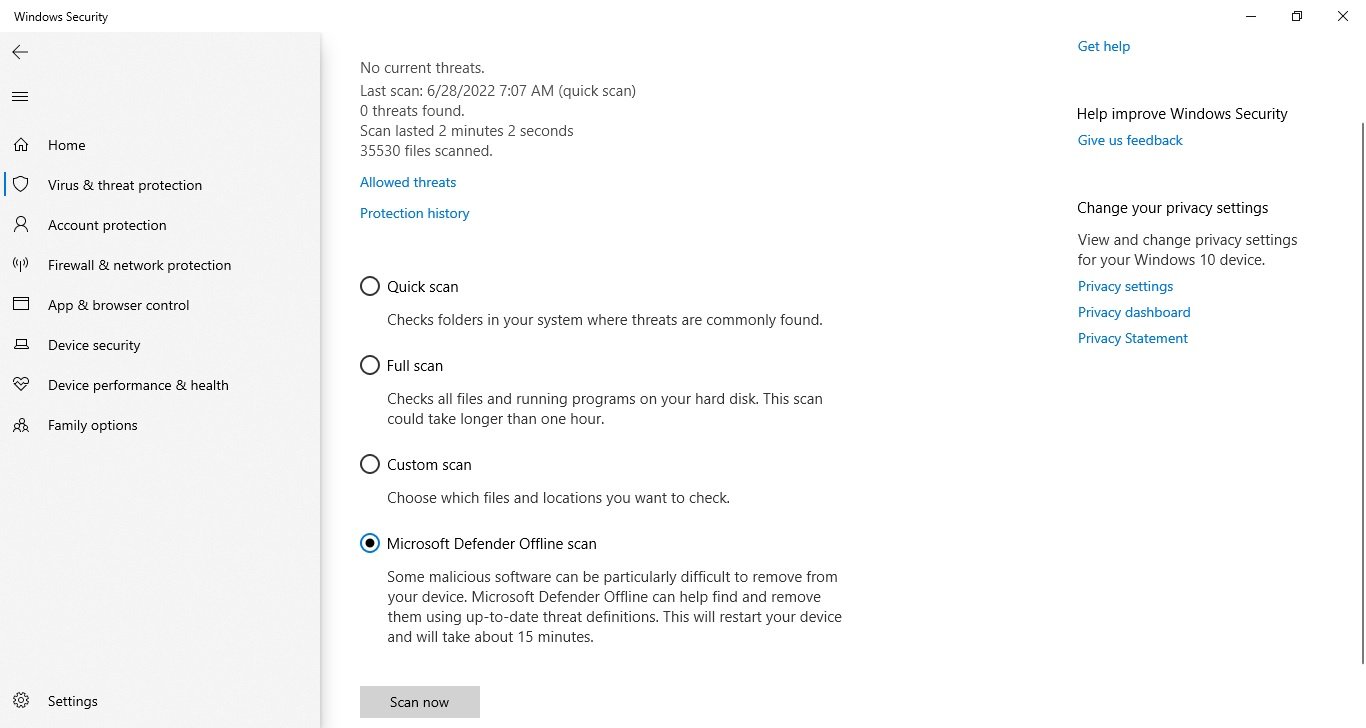
Once you have completed these steps, the device will reboot and boot with the standalone Microsoft Defender antivirus module, which will scan your entire PC. If malicious code is detected, it will automatically be removed or quarantined.
After scanning, the device will automatically boot Windows 10 and you can view the report in the Windows Security app.
How to view the security log
Microsoft Defender Antivirus has an area where you can view the latest protection activity and recommendations.
To view the protection log, follow these steps:
- Click on Virus and Threat Protection.
- Click the Protection Log option.
- Click the Filters drop-down menu and select what you want to see: recommendations, quarantined, deleted or blocked files.
After completing these steps, you will see a report with files that have been deleted, cleared or are still waiting for your action.
How to temporarily disable Windows 10 antivirus
It is not advisable to use a computer without malware protection, but sometimes antivirus can interfere with the installation of an application or software update. In this case, you can temporarily disable Windows 10 antivirus to complete your software installation.
To disable Microsoft Defender antivirus, follow the steps below:
- Click on Virus and Threat Protection.
- Under Virus and Threat Protection settings, select Manage Settings.
- Disable the Real-time Protection slider.
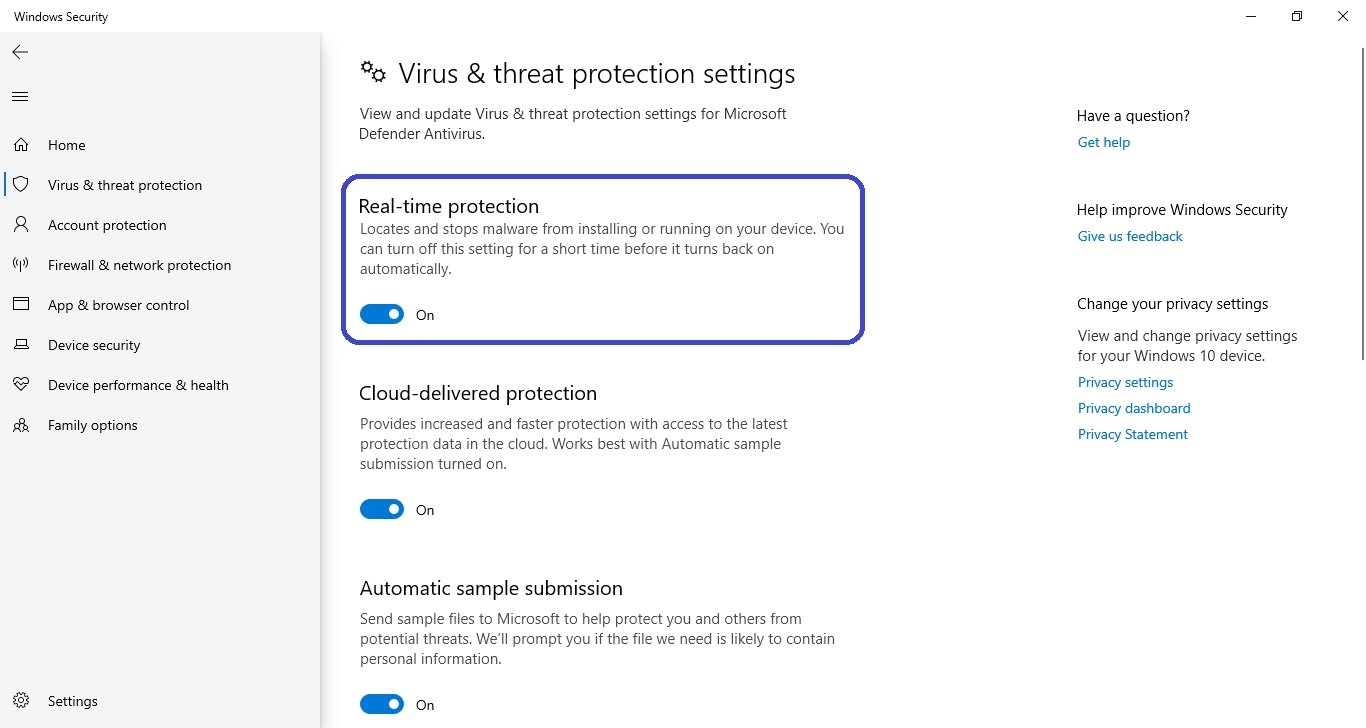
By following these steps, you will be able to complete the tasks that conflicted with the antivirus.
If you do not re-enable the antivirus, it will be automatically activated when you restart your computer.
How to enable ransomware protection
Windows 10 includes a Managed Folder Access feature designed to monitor and protect your data from ransomware attacks or unwanted changes from malware.
As this function can cause false positives, it is inactive by default. You will need to switch it on manually using the Windows security application.
To enable controlled access to folders in Windows 10 follow these steps:
- Click on Virus and Threat Protection.
- Under Virus and Threat Protection settings, select Manage Settings.
- In the Controlled folder access section, select the Manage controlled file access option.
- Activate the slider.
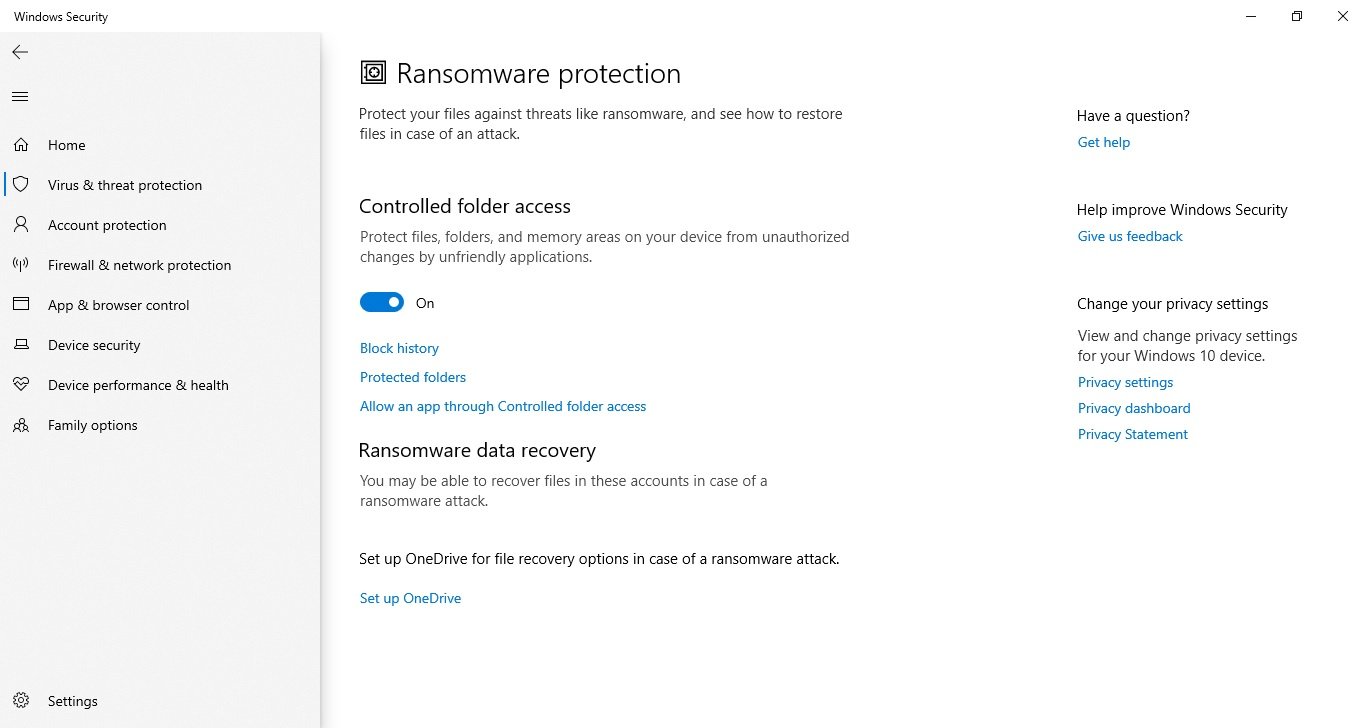
Once these steps have been completed, the security feature will monitor applications attempting to make changes to files in protected folders.
If an application is marked as malicious or unknown, supervised folder access will block the attempt to make changes and you will be notified.
How to exclude files and folders from being scanned
If you have a folder containing files that you do not want scanned for viruses, you can exclude it from the scanning process.
To prevent the antivirus from scanning certain folders, follow the steps below:
- Click on Virus and Threat Protection.
- Under Virus and Threat Protection settings, select Manage Settings.
- Under Exclusions, select the Adding or removing exclusions option.
- Click the Add an exclusion button.
- Select the type of exception you wish to set: file, folder, file type, process and its location.
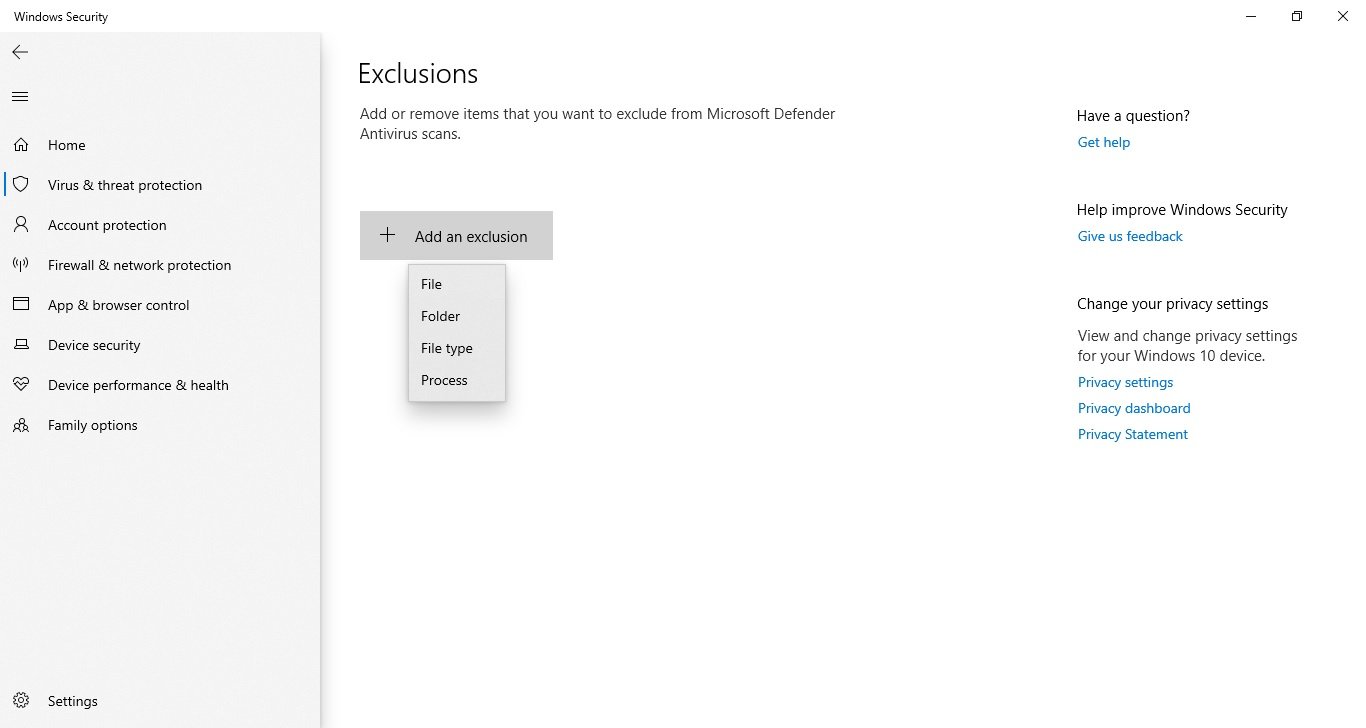
Once you have completed these steps, the antivirus will not scan the specified file, folder, file type or process.
You can add one exception at a time. To add more exceptions, repeat the steps above several times.
How to check account security
The Windows 10 account security feature is designed to monitor and notify you of any problems with your account.
To check the account security in Windows 10, follow the steps below:
- Click Account protection.
- Check that the Microsoft account, Windows Hello and dynamic locking are green, indicating that everything is working properly.
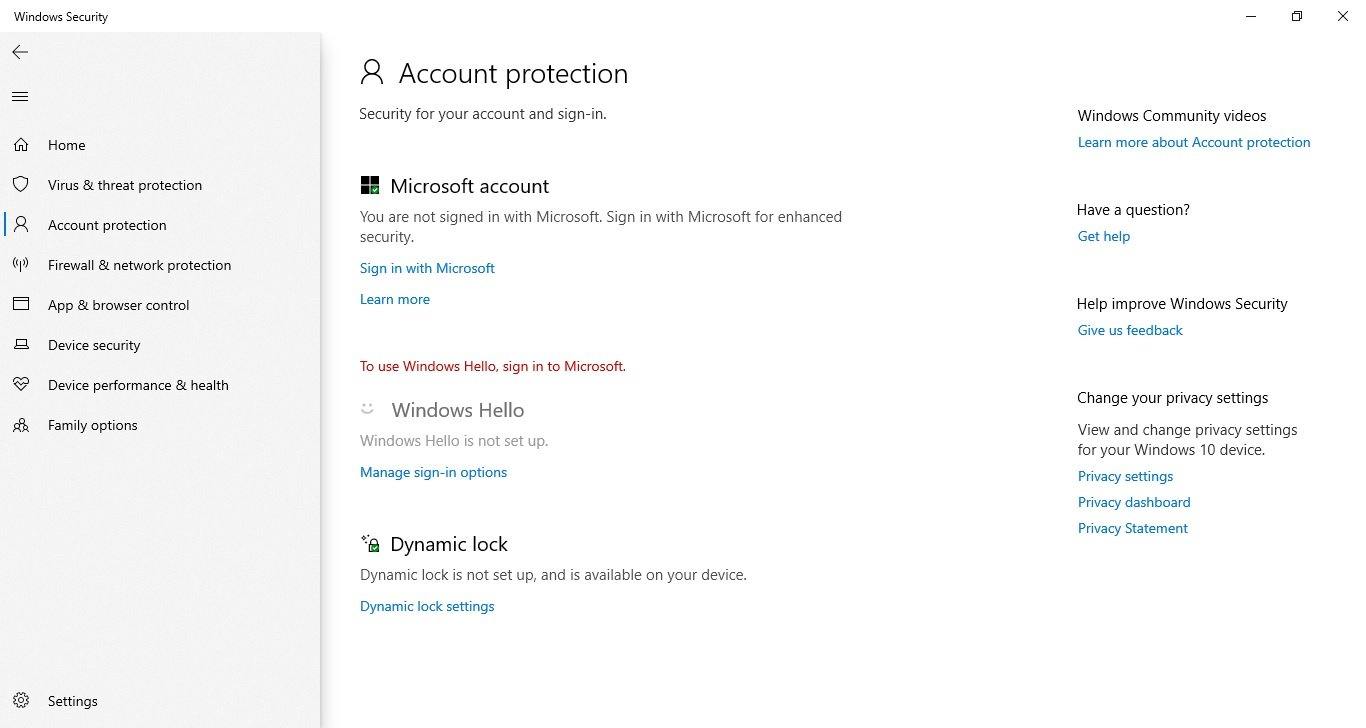
If one of the account security features requires your attention, you will see a warning to take action to rectify the problem.
If you use a password to log in, the system will prompt you to set up an account using one of the available Windows Hello authentication methods, such as fingerprint, facial recognition or PIN.
How to manage network security with a firewall
The app has an area for monitoring and managing Microsoft Defender firewall settings.
Viewing firewall status
To access the firewall settings using Windows security, follow these steps:
- Click Firewall and network protection.
On the page you can see which network profile is currently enabled. The one marked active is the current network profile in use.
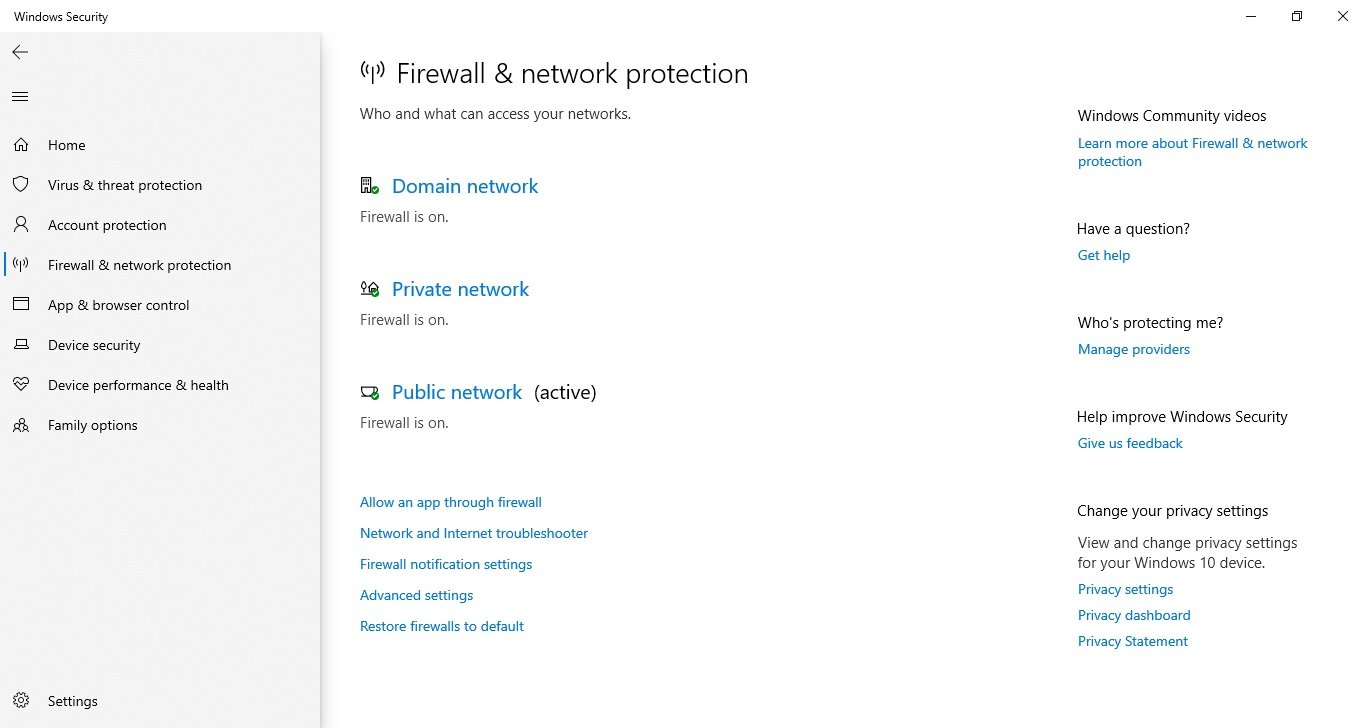
The page also shows the firewall settings that allow applications to pass through the firewall. However, these settings are links to change the configuration via the Control Panel.
Enable or disable the firewall
To enable or disable the Windows Defender firewall, follow these steps:
- Click Firewall and network protection.
- Click on the active firewall. For example, Public network.
- Enable or disable the Microsoft Defender Firewall toggle switch.
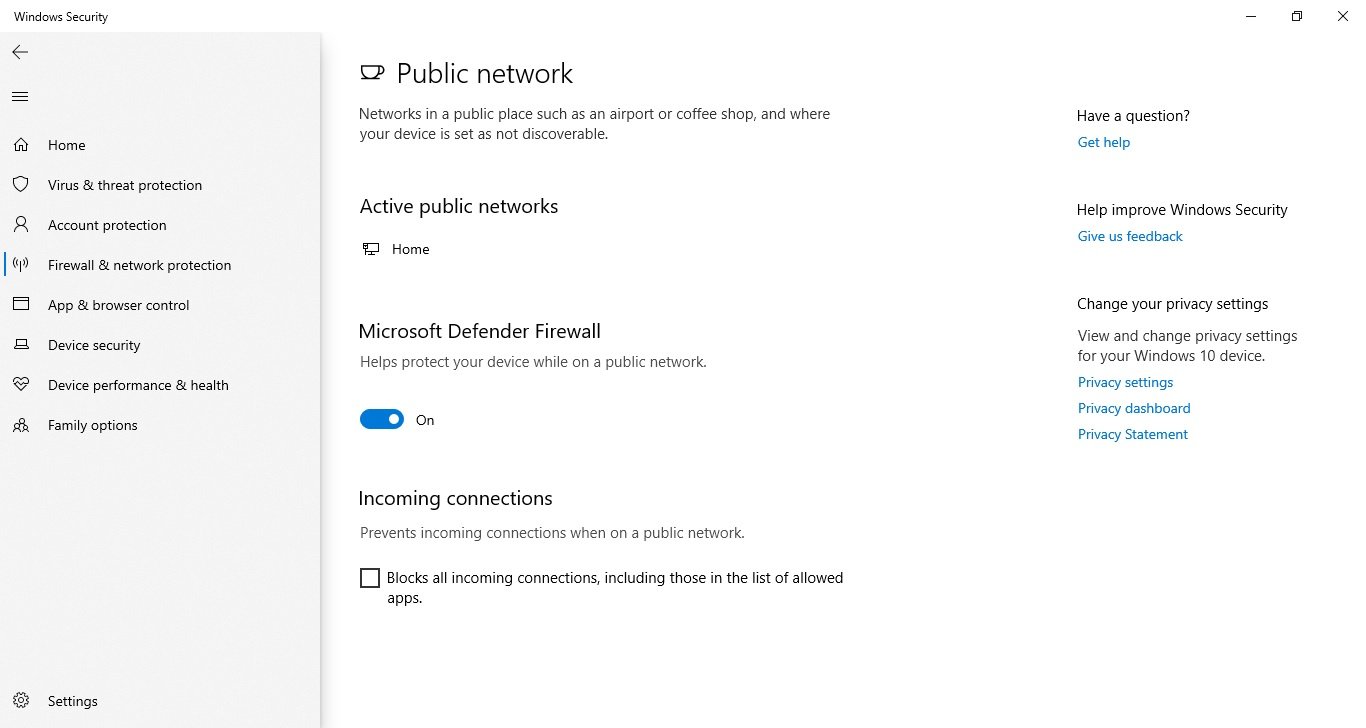
Here you can also check the box to block all incoming connections, including those on the list of allowed apps.
Once you have completed these steps, the firewall will be disabled on your computer.
If you disable the firewall to test an application, remember to re-enable it after the test. If the problem was with the firewall, it is best to create an exception rule rather than completely disabling the security feature.
How to protect your device from malicious code
The Application/Browser Management page allows you to configure application protection and internet security settings to help protect your computer from sites, applications and files with malicious code.
The default settings are the recommended configuration you should use (you can change them at any time).
Protection of reputation
To protect your device with reputation-based protection, follow these steps:
- Open Windows Security.
- Click App and Browser control.
- Select Reputation-based protection settings.
- Activate or deactivate the desired settings according to your preferences.
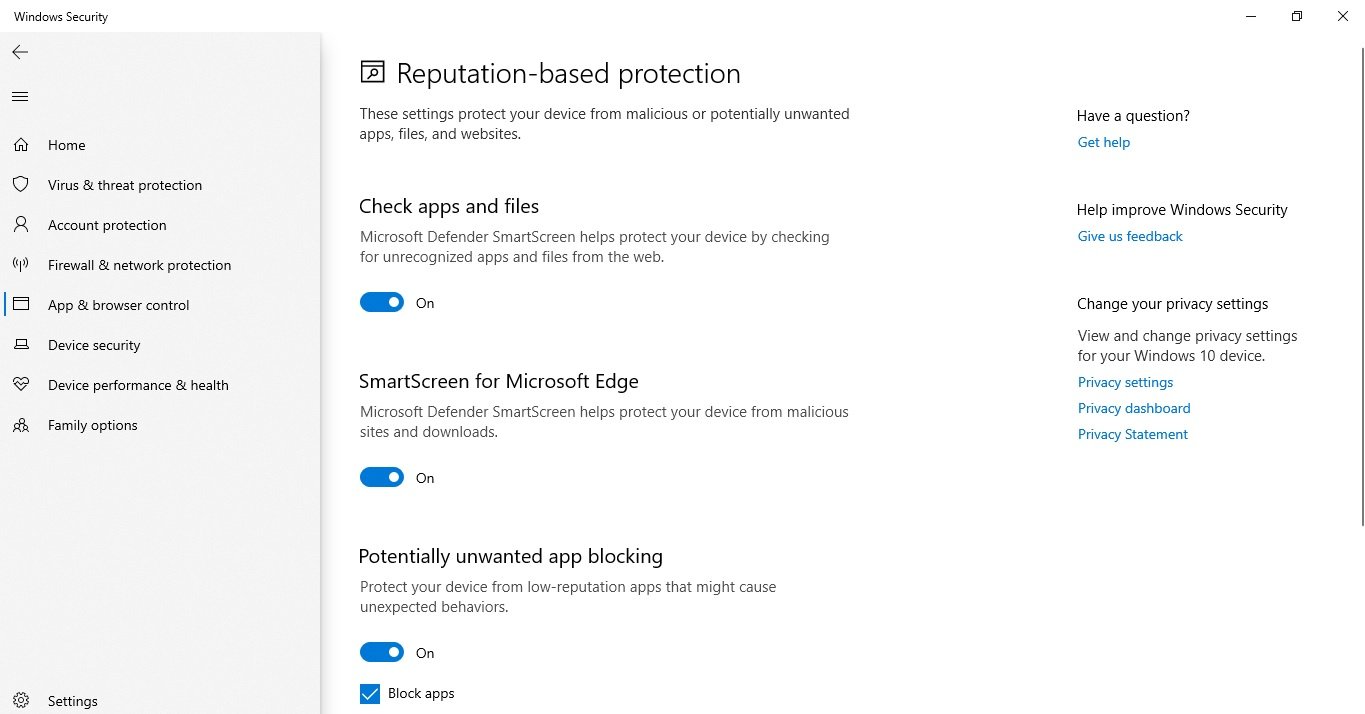
Several options are available:
- Check Apps and Files – protects against unrecognised apps and files from the internet.
- SmartScreen for Microsoft Edge – protects your device from malicious downloads and websites.
- Block potentially unwanted apps – blocks apps with low reputation.
- SmartScreen for Microsoft Store apps – Checks web content that uses apps from the Microsoft Store.
Note: Windows 10 has optimum settings for this feature by default. You can selectively enable or disable them depending on personal preference.
Once you have completed these steps, Microsoft Defender will protect your device from unwanted applications, files and websites.
Isolated view
Isolated Browsing is a feature of Windows 10 Pro, Education and Enterprise editions that is designed to isolate the Microsoft Edge browser at the hardware level to protect your device and data from malware or zero-day attacks.
If this option is available, you can access its settings in Microsoft Defender by following these steps:
- Click App and Browser control.
- Click the Change Application Guard settings option.
If you are using a supported version of Windows 10, you will be able to access the settings if the “Microsoft Defender Application Guard” component is enabled using the “Enable or Disable Windows Features” function.
Having completed these steps, you can start a new secure browsing session by opening the new Microsoft Edge browser based on the Chromium engine, clicking the main menu button (three dots) and selecting the “New Application Guard window” option.
Exploit protection
Exploit protection is an advanced feature that can help reduce malware and vulnerabilities.
Windows 10 includes the most optimal settings for protecting against exploits. You should not make any changes to them unless you know what you are doing.
To configure the anti-exploit settings, follow the steps below:
- Click App and Browser control.
- Click the Exploit Protection settings option.
- Select the System Settings tab and configure the settings according to your personal preferences.
- Similarly, configure the Program Settings tab.
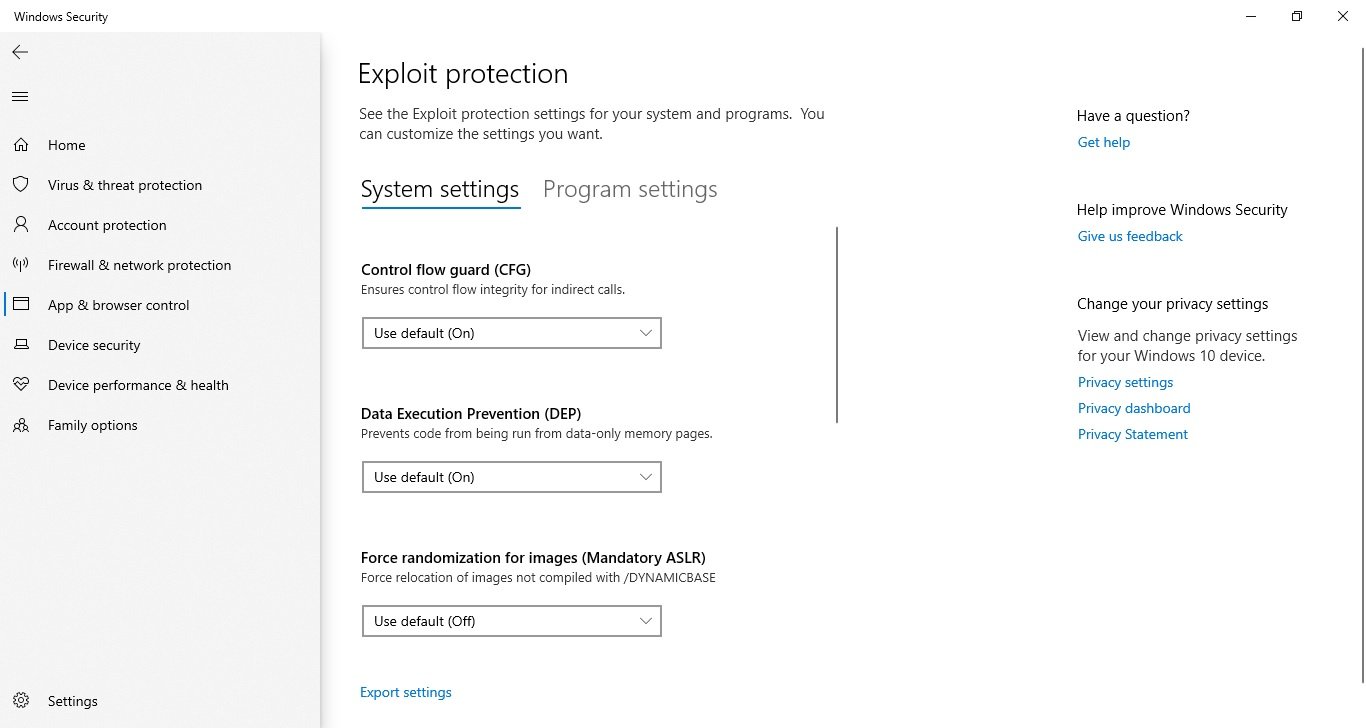
Once these steps have been completed, the anti-exploit protection will work on the device according to your settings.
How to enable core isolation in Windows Security
Core isolation is a virtualisation technology that adds an extra layer of protection against sophisticated attacks.
You normally do not need to worry about this feature, but you can enable it by following these steps:
- Click on Device Security.
- Click on the Core isolation Information option.
- Enable the memory integrity slider.
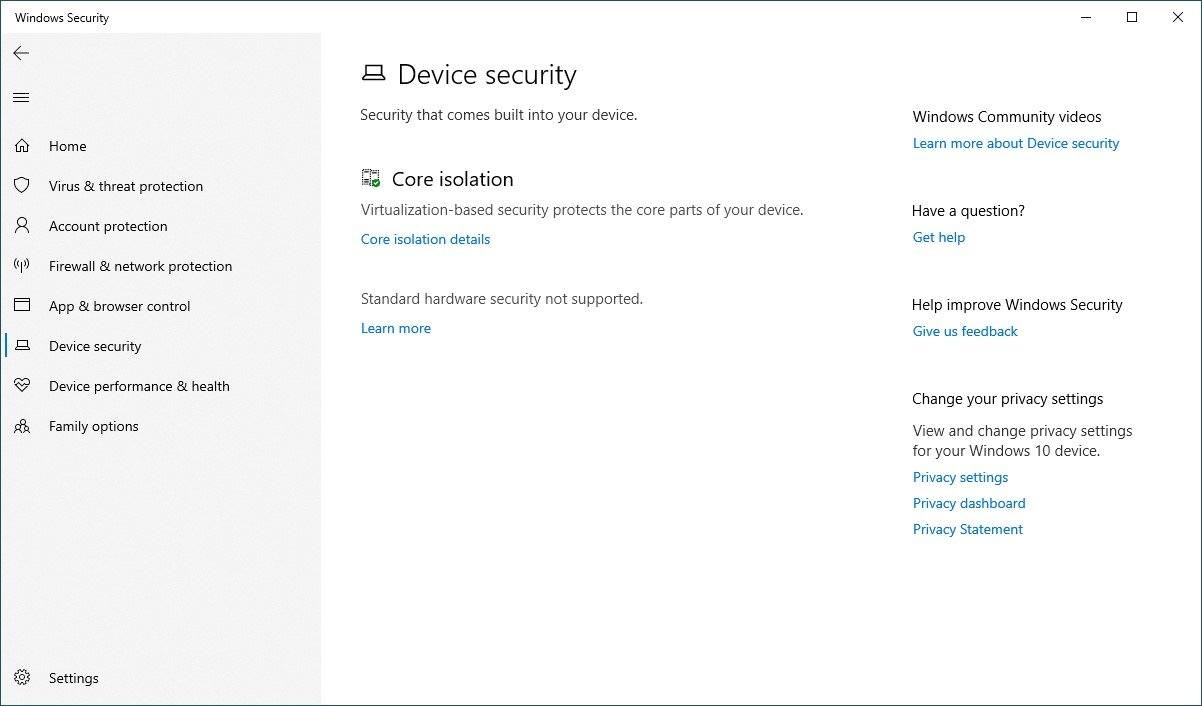
Once these steps have been completed, you must restart your computer for the changes to take effect.
If you do not see this option, it is likely that virtualisation is not enabled in the Basic Input/Output System (BIOS) or Unified Extensible Firmware Interface (UEFI).
How to view the health and performance report
Windows Security includes information about the status and performance of your computer.
To view the device availability and performance report, follow the steps below:
- Click on Device performance and health.
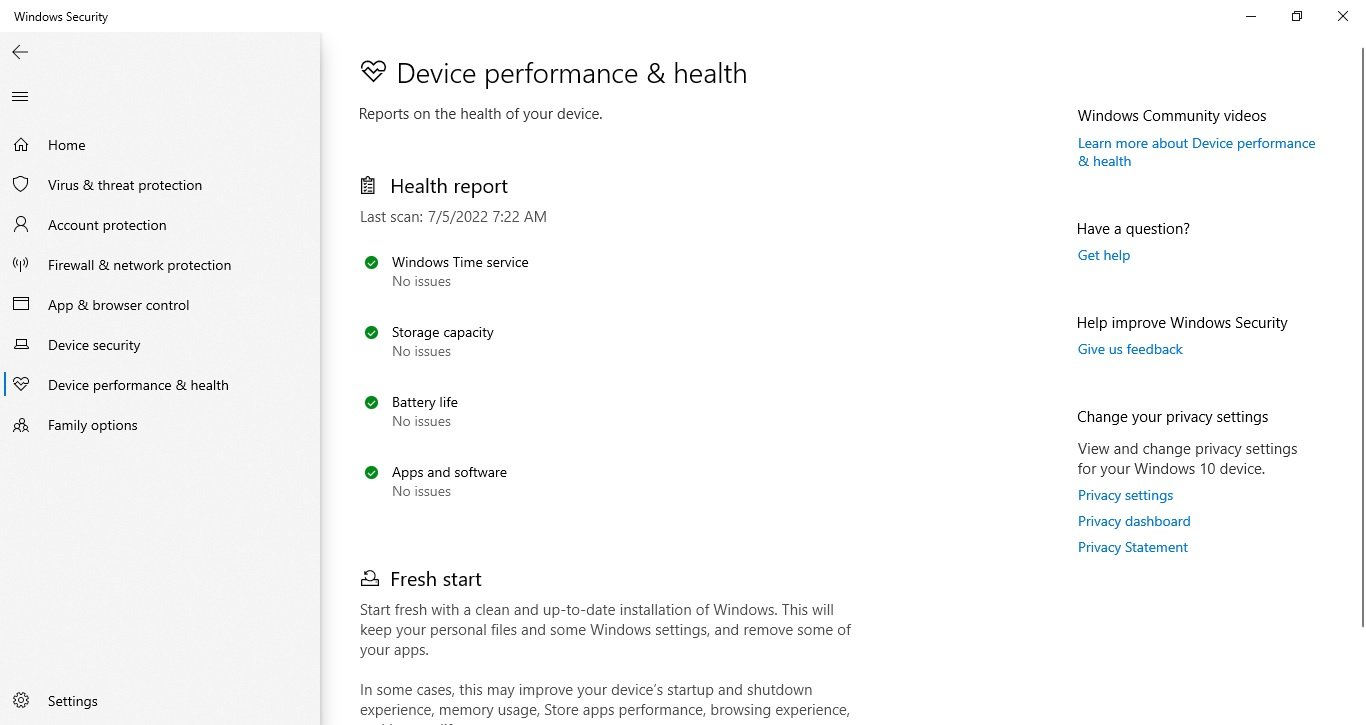
The report includes statuses for Windows Update Centre, storage, device driver and battery. If any action needs to be taken, you will see a warning message with recommendations on how to rectify the problem.
Here are the values for each possible status state:
- Green: everything works correctly.
- Yellow: an advisory is available.
- Red: warning requiring immediate attention.
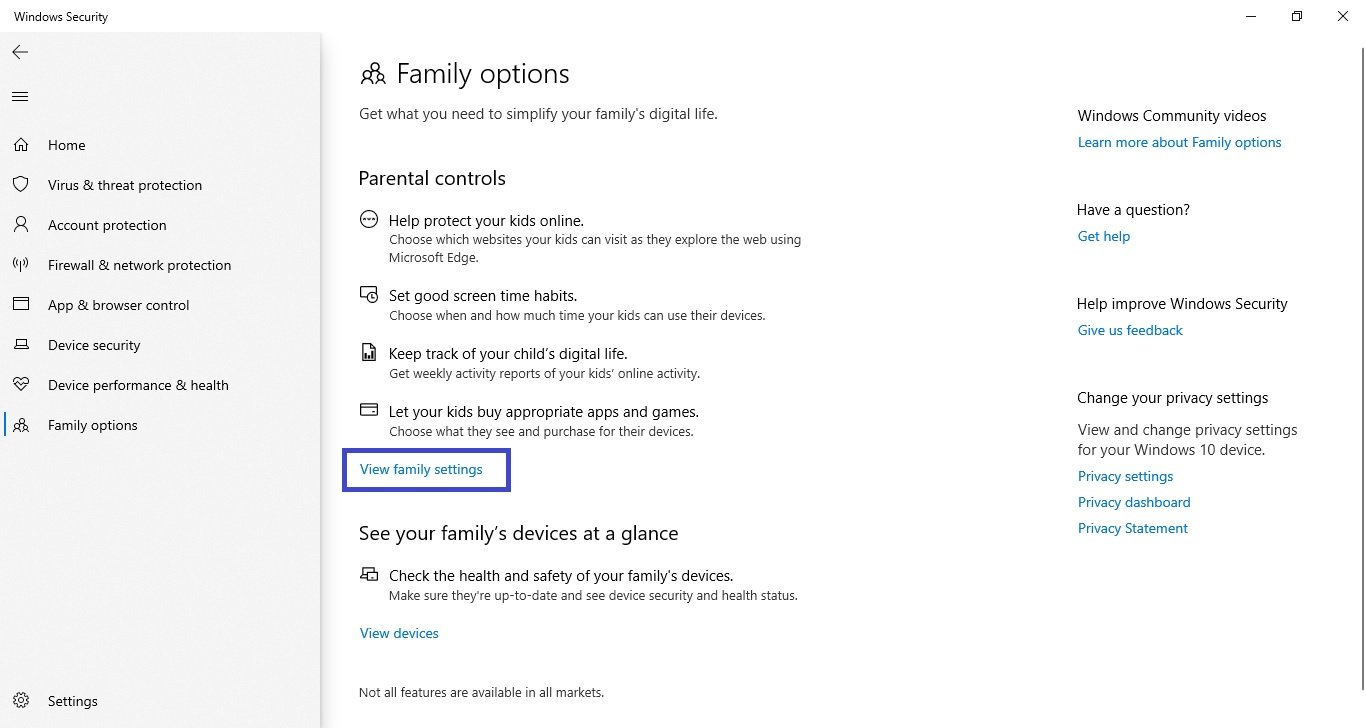
How to manage parental controls and monitor devices
The Family options section is not the place to manage any settings. It offers access to a Microsoft account to manage parental controls and other devices connected to the account.
To access the family settings, follow the steps below:
- Click on Family options.
- Under Parental controls, select “View family settings” to open these settings in your Microsoft online account.
- Under “Quick overview of family devices”, select “View device settings” to open these settings in your Microsoft online account.
Configuring Windows security notifications
There is a settings page that allows you to manage third-party antivirus and firewall and notification settings.
To deactivate the defender notifications, follow the steps below:
- Press the “Settings” button in the bottom left corner of the window.
- Under Notifications, select the “Manage notifications” option.
- Set the notifications according to your preferences.
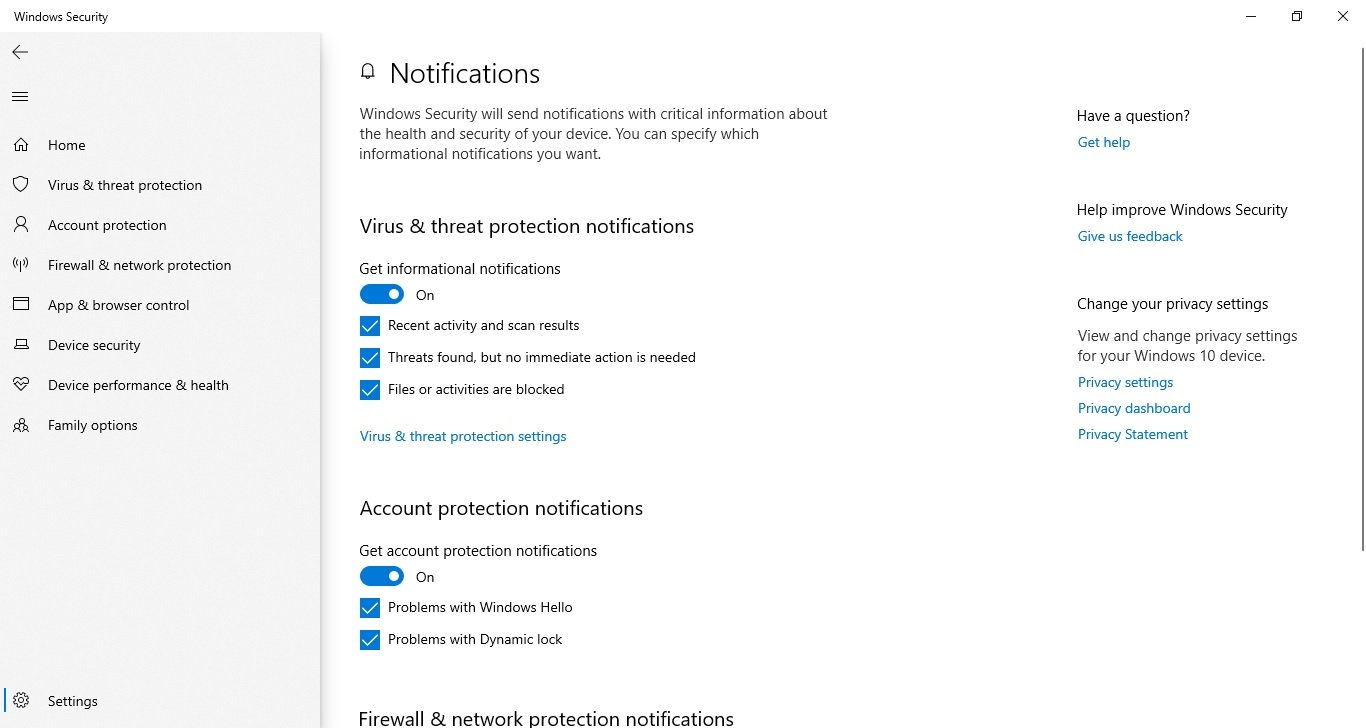
Once these steps have been completed, the notifications will behave according to your configuration.
On the settings page you will also notice a section called “Security updates” which displays a list of installed third-party security solutions – web protection, firewall and antivirus. No settings can be configured here, but you can use this page to open the settings in the application itself.
In summary, you can use third-party solutions from popular companies such as Norton, AVG, Avast, Bitdefender, but the standard Windows 10 features offer a good set of tools with a simple interface that work quickly and can compete with any other solution.