The lock screen in Windows 10, in addition to its direct function, also serves an informational role: it displays the date and time, notifications from some applications.
After a long period of inactivity, the Windows screen locks. In this case, the user will have to enter his or her account password in order to log back into the operating system and continue using it.
In some cases, this order is not always convenient, and also not necessary, for example when the computer is used by only one user in his home.
It is not possible to disable the lock screen directly from Windows, there is no such feature in the user settings. To disable the lock screen, use the local group policy editor or the system registry editor
How to disable the lock screen in Windows 10 using the Local Group Policy Editor
The Local Group Policy Editor is available in Windows 10 Pro, Enterprise, and Education editions.
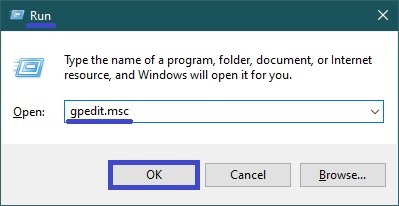
To disable the lock screen in Windows 10, open the Local Group Policy Editor by pressing Win + R, in the Run window that opens type (copy and paste) gpedit.msc and click OK.
In the Local Group Policy Editor window that opens, expand the following list items:
Computer Configuration ➯ Administrative Templates ➯ Control Panel ➯ Personalization
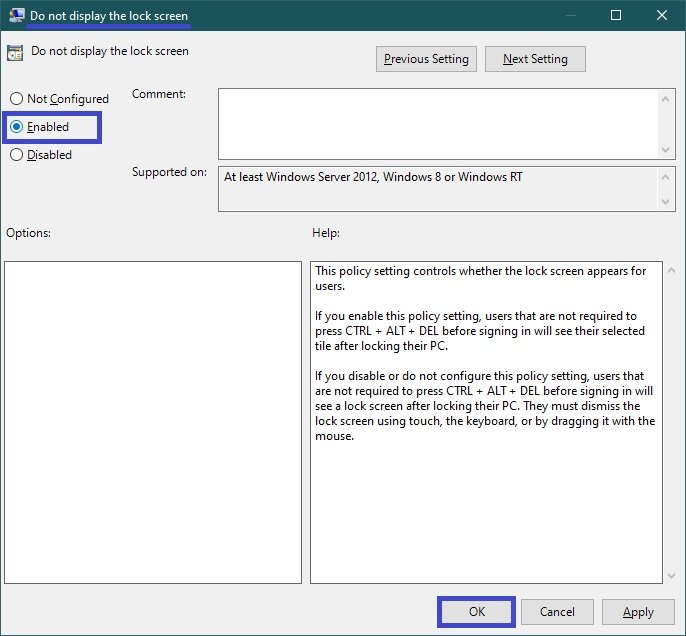
Next, on the right side of the window, double-click the policy setting called Do not display the lock screen

In the Do not display the lock screen window, set the switch to Enabled and press the OK button.
For the changes to take effect, restart your computer.
So now, after a long period of inactivity, Windows will not turn on the lock screen, and the Login Screen will start immediately when the computer is turned on.
How to disable the lock screen in Windows 10 using the registry editor
This method is suitable for all editions of the Windows operating system and involves changing settings in the Windows Registry.
Before making any changes to the registry, it is strongly recommended to create a system restore point
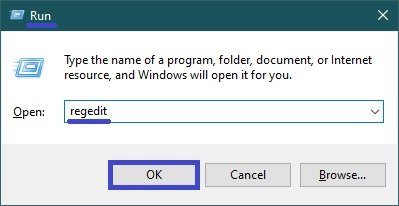
To disable the lock screen in Windows 10, open the registry editor by pressing Win + R on your keyboard, enter (copy and paste) regedit in the Run window that will open and press OK.
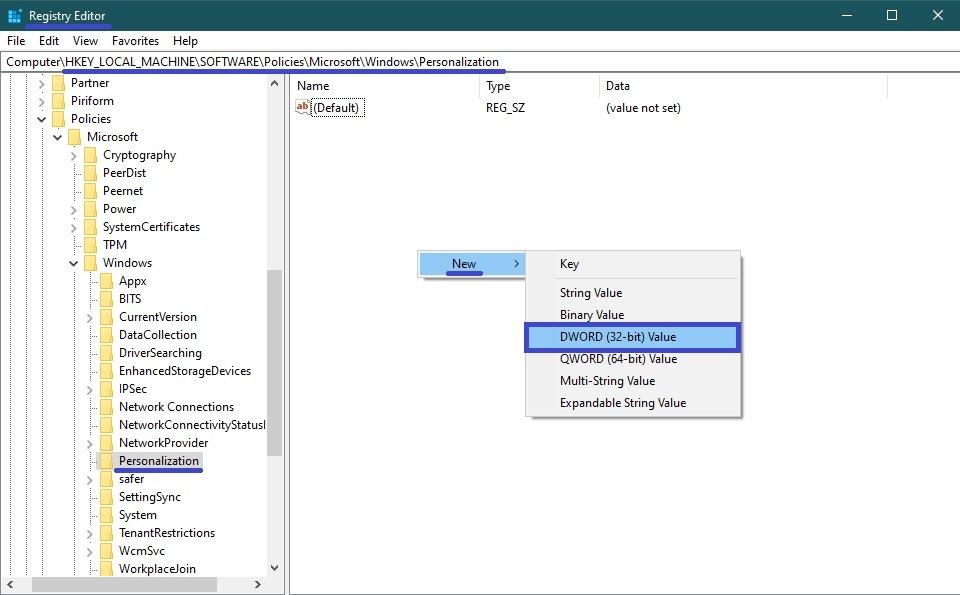
In the Registry Editor window that opens, navigate to the following path:
HKEY_LOCAL_MACHINE\\SOFTWARE\\Policies\\Microsoft\\Windows\\Personalization
If there is no Personalization section, create one.
Next, right-click on the Personalization section or right-click on the empty area on the right side of the window and select New → DWORD (32 bit) Value from the context menu. Give the created parameter the name NoLockScreen.
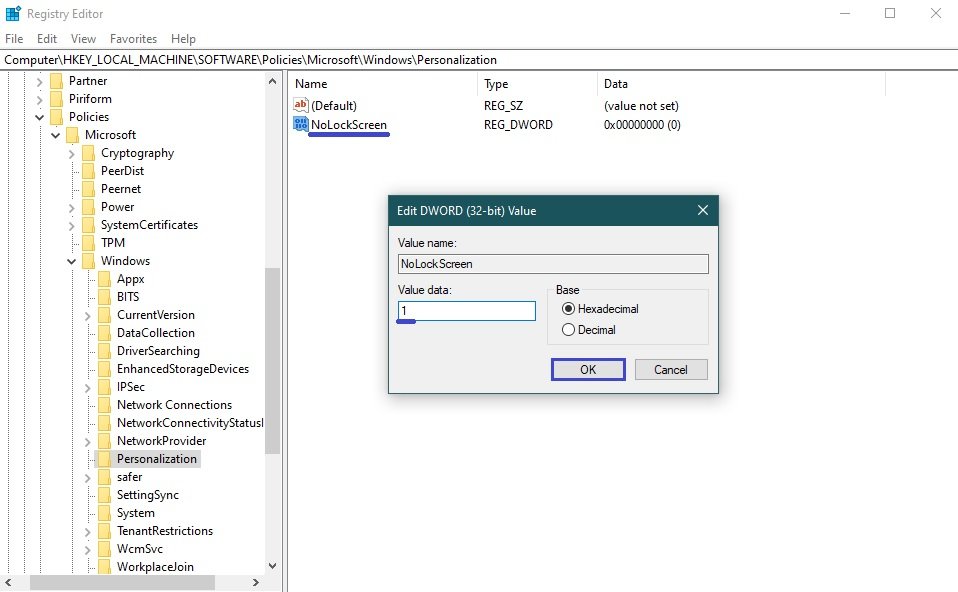
Then double-click the NoLockScreen parameter and set its value to 1 and click OK. Close the registry editor and restart the computer for the changes to take effect.
How to disable the lock screen in Windows 10 using a registry file
This method also allows you to disable the lock screen in Windows 10 by making changes to the Windows system registry through a registry file.
Before making any changes to the registry, it is strongly recommended to create a system restore point
All changes made in the registry are shown below in the registry file listings.
To disable the lock screen in Windows 10, create and apply the following registry file:
Windows Registry Editor Version 5.00.
[HKEY_LOCAL_MACHINE\\SOFTWARE\\Policies\\Microsoft\\Windows\\Personalization].
“NoLockScreen”=dword:00000001
To enable the lock screen in Windows 10, create and apply the following registry file:
Windows Registry Editor Version 5.00.
[HKEY_LOCAL_MACHINE\\SOFTWARE\\Policies\\Microsoft\\Windows\\Personalization].
“NoLockScreen”=dword:00000000
After applying the registry files, restart your computer for the changes to take effect.
Using the above methods, you can disable the lock screen in Windows 10.